One of my favorite memories growing up in my small Bavarian hometown is of admiring all of the different store window displays right before Christmas. I feel so incredibly lucky to have experienced a world in which small privately-owned shops still dominated the shopping landscape, at least in more rural areas. It seems like everyone really pulled out all of the stops in preparation for the big holiday.
This last in my three-part Dollar Tree tray makeover series reminds me of those magical store windows so long ago. You can see how I transformed one of them into a cute succulent wall planter and the other one into an adorable tiled tray.
The concept is so simple and what I love most about this project is that you can let your fantasy free reign. My little shadow boxes – I just had to make more than one – are just a few basic examples. Of course, you can make them fit your taste and decor and completely customize them to your liking. Use what you already have on hand!
They are cute gifts that take up hardly any space and a super fun and easy craft project you can create with your kids or grandkids.

* This post contains affiliate links. If you make a purchase by clicking on an affiliate link, I may earn a small commission at absolutely no additional cost to you. You can view my complete affiliate link policy HERE.
HOW TO MAKE WINTER SHADOW BOXES
The very best part of this craft project is that it requires only a couple of basic supplies and no special tools at all. And the possibilities are endless! As I mentioned above, I used small wood trays that are currently available at the Dollar Tree. For only a dollar a piece you just cannot beat them. They also carry a variety of other craft supplies like little wooden cubes, miniature people and animals, beads, string, etc. I will try to list as many sources as possible to make it easy for you. But I bet you already have some items on hand that can be used as well.
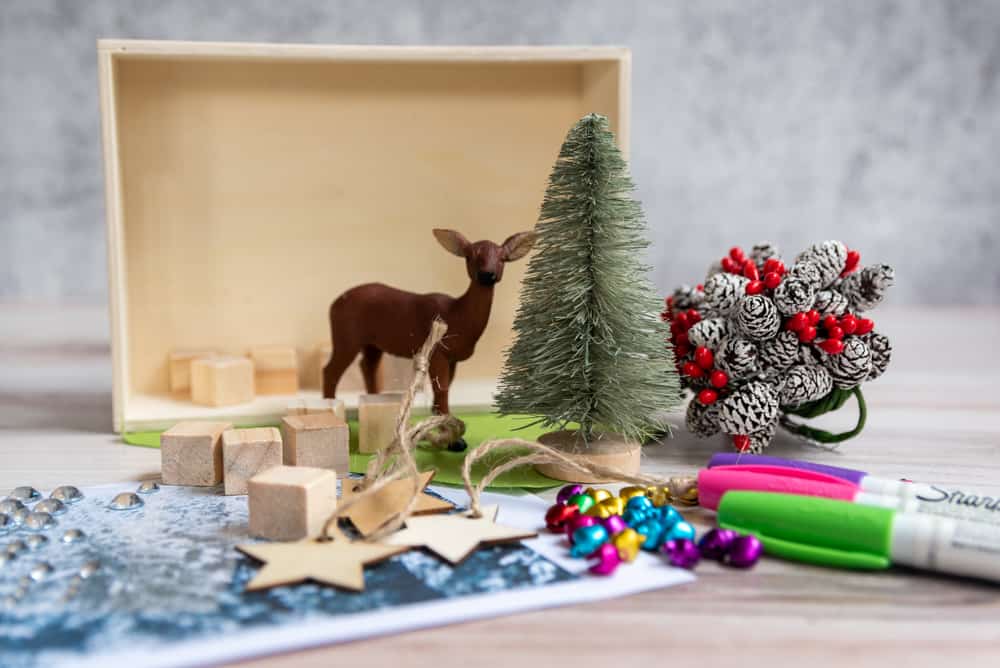
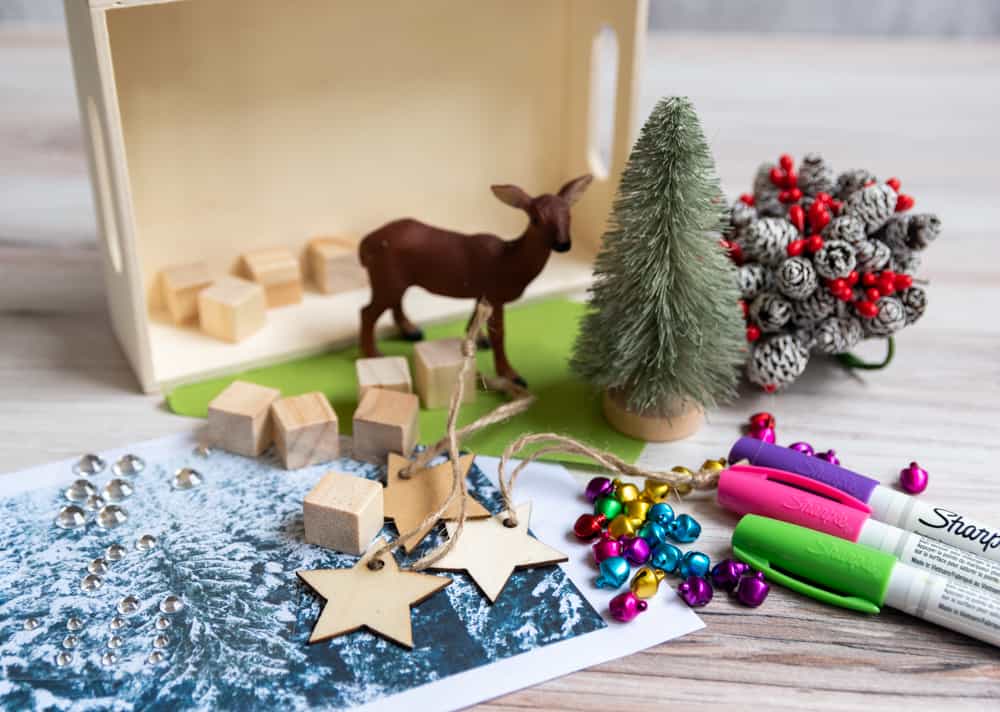
Here is a sample of some of the things I used to decorate my boxes.
For this post I created three different versions just to give you some ideas and I will go through each of them with you.
SNOWBALL FIGHT SHADOW BOX
The first box was inspired by all of the fun I had as a little girl playing in the snow with my brothers. We were fortunate enough to live right below the best sled run in town!
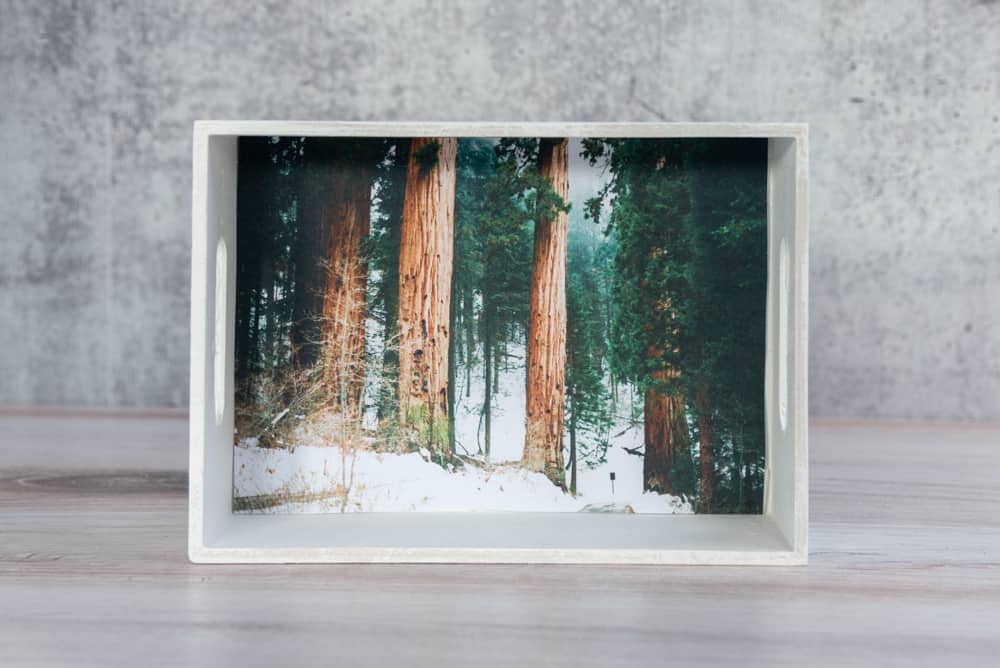
With this box, I wanted to create a very realistic feel. The winter forest background definitely accomplishes that. You can find the exact one I used here and a few other printable backgrounds in the Free Resource Library. No password? No problem! Just sign up here and it will be on its way to your inbox.
SUPPLIES NEEDED:
- Small wood tray – from Dollar Tree or similar
- Acrylic craft paint (white or color of your choice)
- Craft brush
- Sandpaper
- Mod Podge Decoupage medium in matte – optional
- Small bottle brush tree
- Figurines – Dollar Tree
- Foam mounting tape
- Cotton Balls
- Printed forest background – from Free Resource Library
- Small Christmas House
PREPARE AND PAINT
Begin by sanding any rough spots on the wood tray. Pay close attention to the top edge and the inside of the handles. Once the tray is nice and smooth all around, it’s time to paint. Acrylic craft paint is inexpensive, comes in a wide array of colors, and is easy to work with. For my shadow boxes, I used three different colors. My money and space-saving tip: buy primary colors and mix your own custom shades.

For a more duarble and finish, apply a coat of polyurethane or mod podge if you happen to have it on hand.
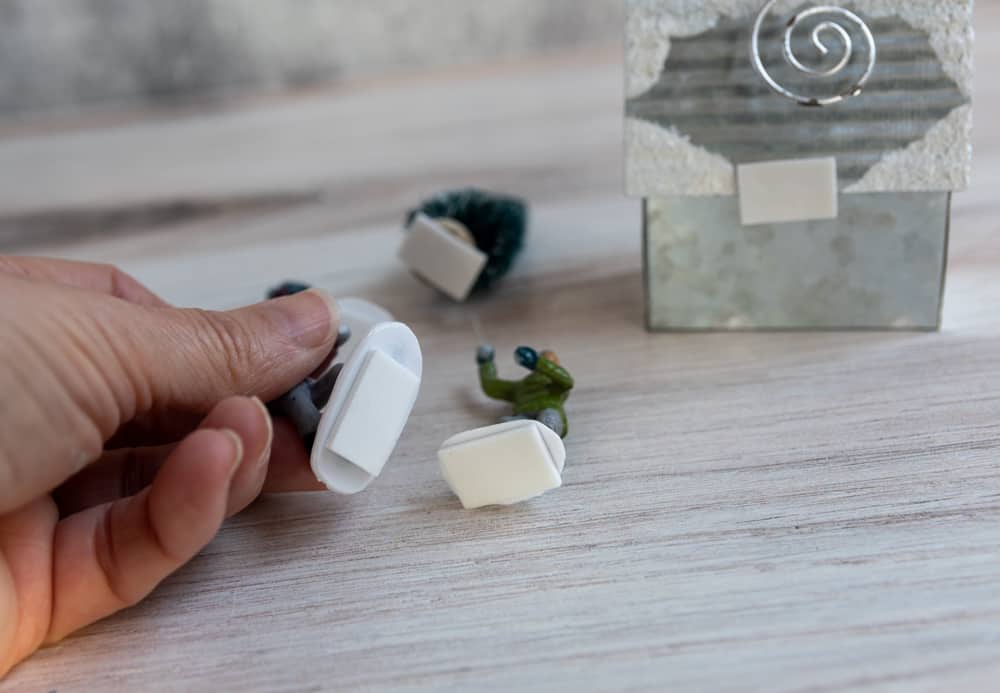
If you plan to hang your shadow box on the wall, add a sawtooth picture hanger to the back of the tray before decorating. Little silicone bumper dots (they come in handy for all kinds of stuff) on the bottom ensure that your box will hang on the wall without tilting.
DECORATE AND FINISH
Once the paint is completely dry, the real fun begins!
First, apply the background to the tray. You have a couple of options here. For a temporary fix, use small pieces of foam mounting tape to make sure it stays in place. That is what I did for my shadow box. For a more permanent option, use mod podge to hold the background in place securely. Check out this post on how to use mod podge, if you are not familiar with it.
The next part is easy. Apply foam mounting tape to the pieces you are using, then set them in place. Be sure to try out how you would like your scene to look before sticking them into place.
To add “snow” I plucked a cotton pad apart and just placed it around my snowball throwers feet loosely. You could certainly use craft glue and tack it down.
That’s it! I really love how it turned out. It makes me smile every time I look at it. What do you think?
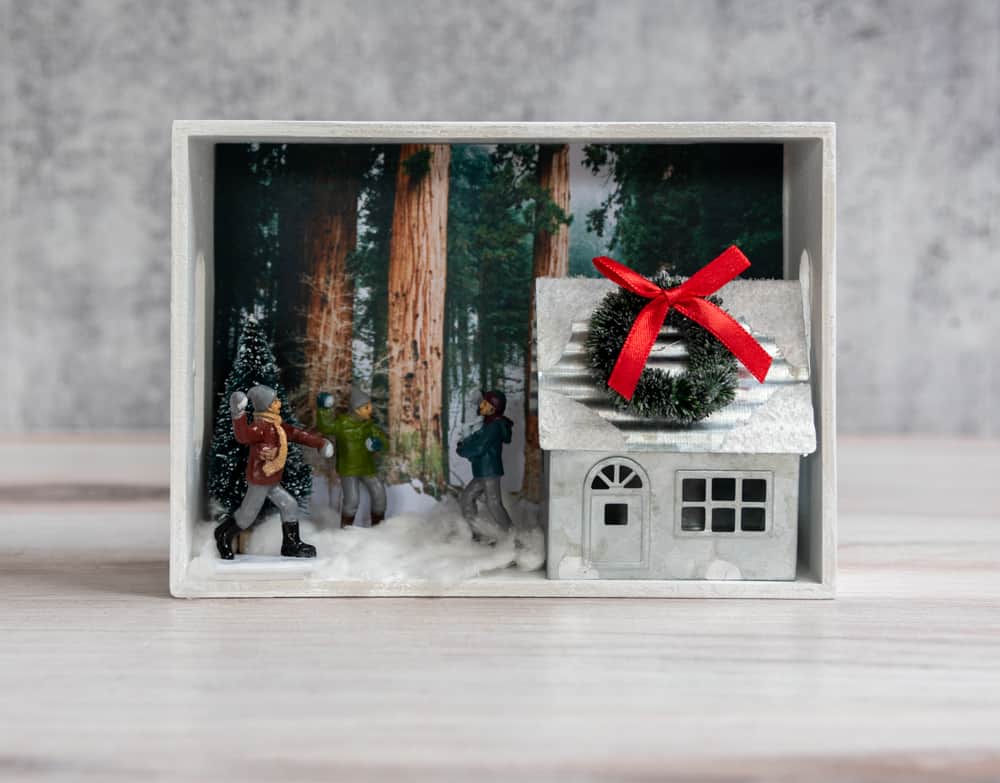
The little tin house was a Christmas place card holder I snagged at the Hobby Lobby a while back. I just bent back the cardholder part on top. If you can’t find the same one, look for ornaments you might be able to use or scan the miniature decor section. You never know what you will find.
UPRIGHT GLAM CHRISTMAS SHADOW BOX
The next little shadow box shows that you can go in a completely different direction with this craft – literally. To accommodate a slightly larger tree that I already had on hand, I decided to turn the tray vertically.
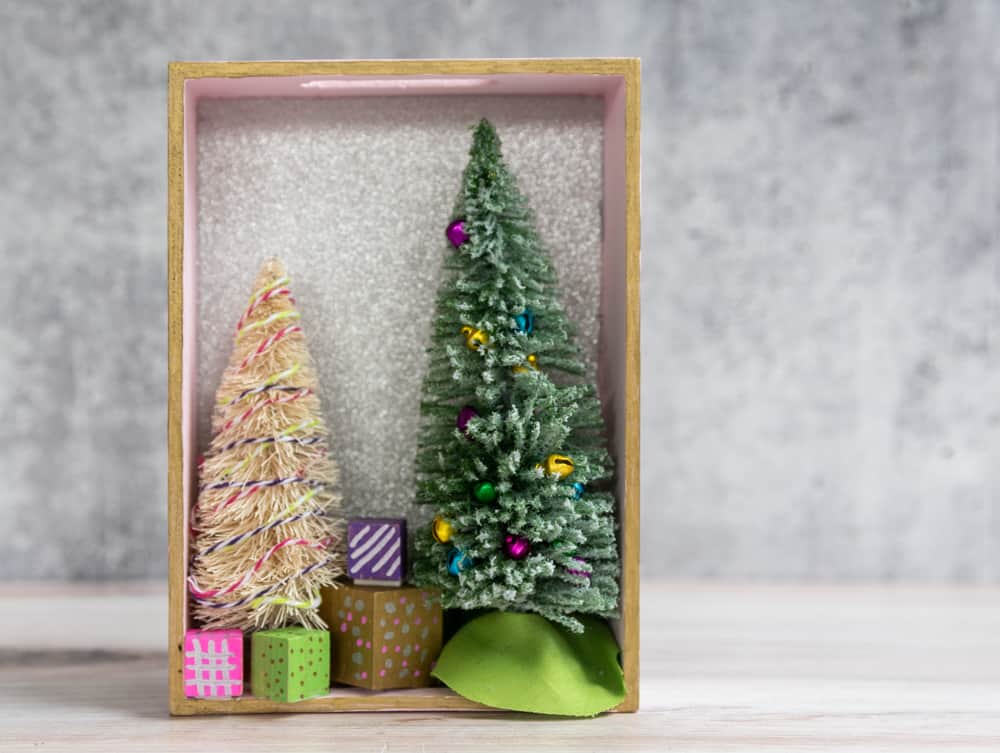
Bottlebrush trees in different colors are adorned with colored string and small metal bells tucked into the branches. The glittery background is actually self-stick laminate paper I found at Walmart a while back. The presents were created from small wood cubes, painted and decorated with oil-based Sharpie pens. You can paint them with acrylic craft paint or regular sharpie pens as well. To cover the base of the larger tree I simply cut a tree skirt from a fabric remnant I had on hand. The edge of the box is gilded with a gold sharpie pen. Wouldn’t this be so cute in a little girl’s room?
I adore bottle brush trees. Did you know they are actually pretty easy to make? If you are interested in giving them a try, I found this video for you.
PASTEL WOODLAND THEMED WINTER SHADOW BOX
I’ll tell you a secret if you promise to keep it. This last one is my absolute favorite. I have always had such a soft spot for woodland animals and often use them in my Christmas decor as I did when I made these fun globes.
This tray was painted a soft blue. Then I added natural wood elements and yet another bottlebrush tree in a pastel color. A small wood star got a makeover with silver sharpie paint and a few sparkly tack on gems I happened to have on hand. The tiny pine cones were plucked from the pick you see in the picture above showcasing various decor items.
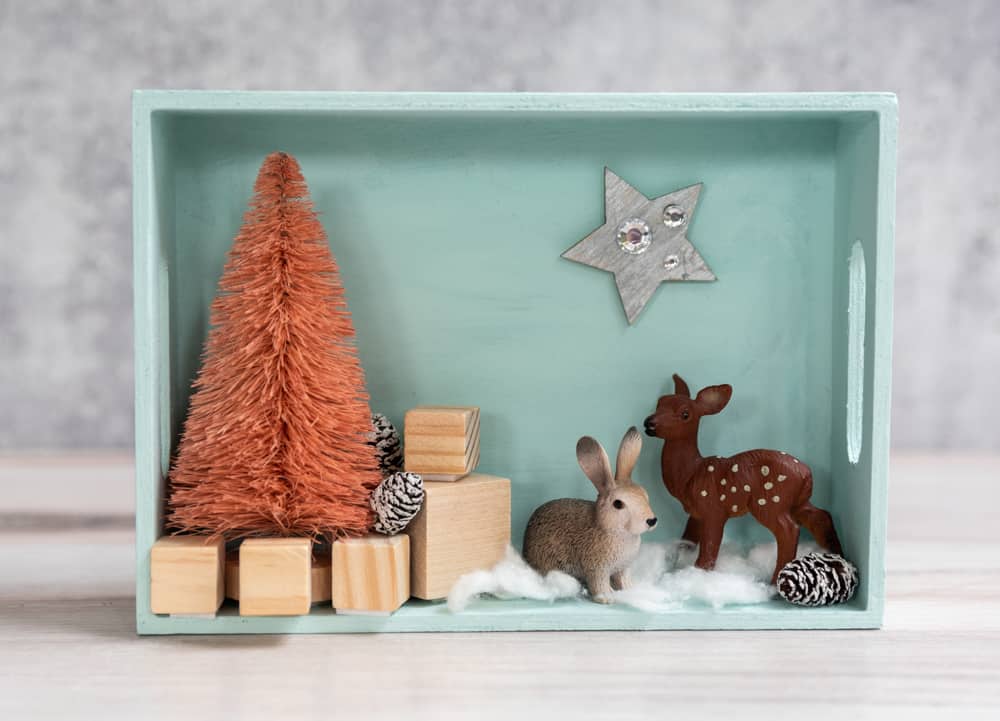
I love that it is Christmas-y without screaming jingle bells. You can really leave this one up throughout the entire winter season. Which one is your favorite?
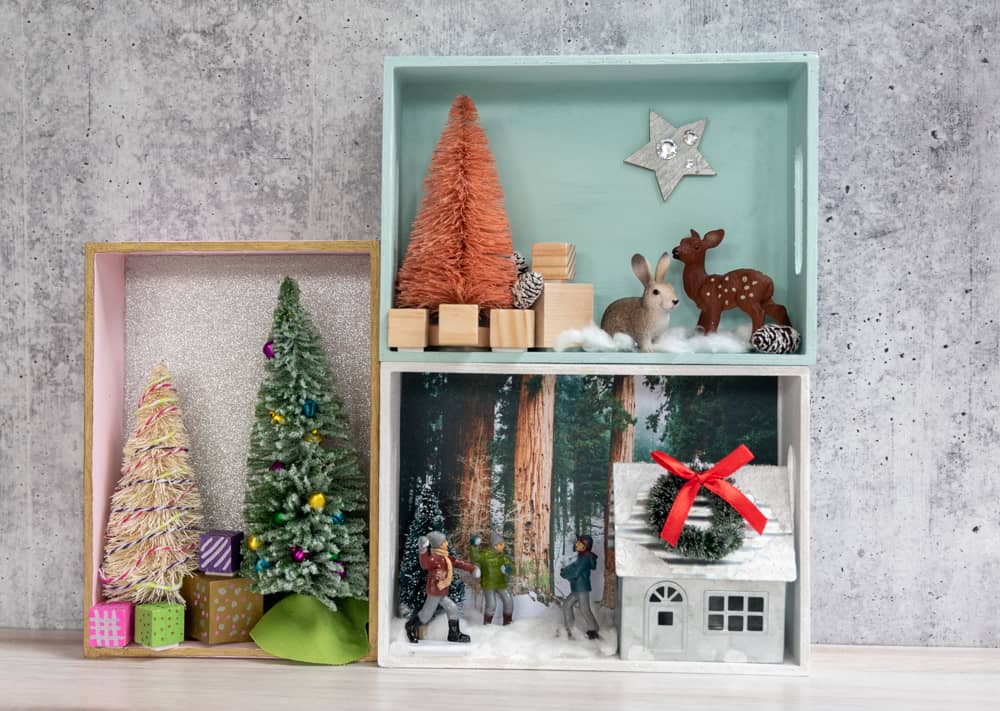
These little winter shadow boxes are not only compact decorations that will work in even the smallest spaces but also wonderful personalized gifts. I know I will be heading out to the Dollar Store to buy more of them. While this post focuses on creating them for winter or as seasonal holiday decor, they can be created for any time of year.
Be sure to catch up with the other two posts in the Dollar Tree makeover series for more inspiration and easy DIY gift ideas:
HOW TO CREATE AN ADORABLE MOSAIC TILE TRAY
EASY FAUX SUCCULENT WALL PLANTER
Don’t forget to grab your printable shadow box backgrounds from the Free Resource Library!