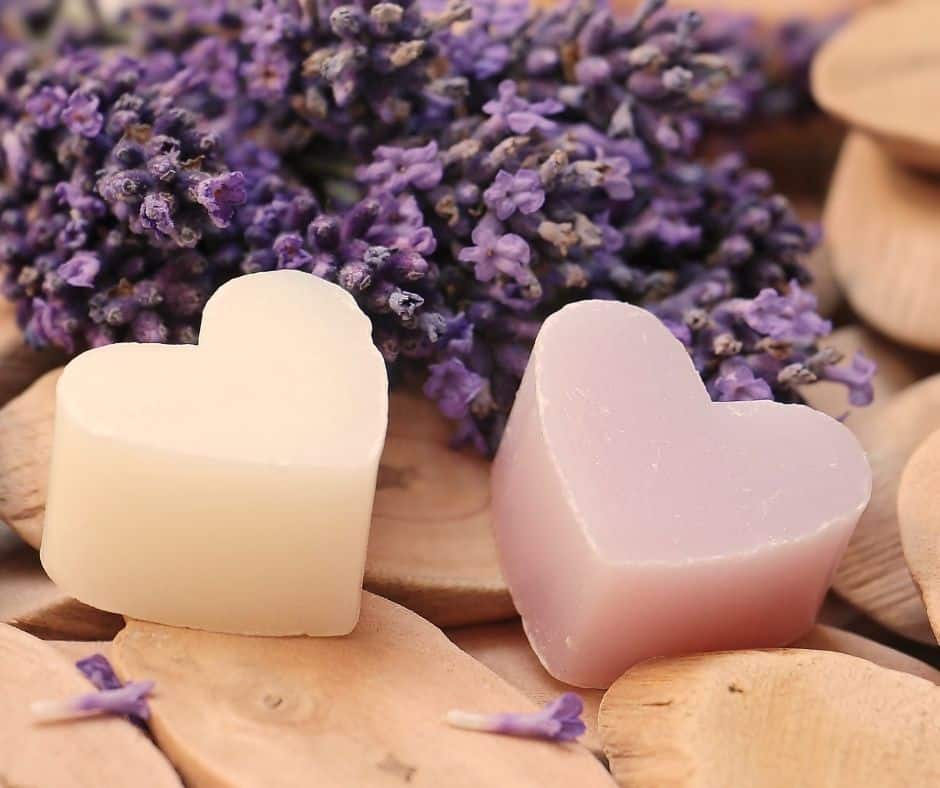
Melt and pour soap is a wonderful, easy-to-use beginner product for creating natural customized skin and body care. If you prefer to have control over what is in your skincare but the thought of working with scary dangerous chemicals like lye has kept you from trying your hand at soap making, you will love this! With a few melt and pour soap basics under your belt, you may never buy commercially made soap again.
A few years ago I might have given making my own soap completely from scratch an honest try, but they pretty much lost me with the 4-week minimum time it takes to cure fully. I may have time for that but definitely no patience. If I am going to put effort into something, I need to see results right now!
Besides, making soap completely from scratch requires special equipment, a place to store it, learning, in short, a level of commitment I just don’t have. But when I first tried my hand at creating homemade soap with melt and pour base, I was hooked.
And while it is quite easy to make, there are always a few tips and tricks that will make it even simpler.
When I was looking for answers to some of the most common questions about melt and pour soap basics, I was not able to find them all in one place. As a matter of fact, it took considerable time to hunt down those answers.
This post is comprehensive and I hope it will serve as a reference for you to come back to again and again. I want you to be well equipped with knowledge whether this your first try or you have attempted making your own soap before with less than perfect results. Be sure to pin it so you can find it again easily!
* This post contains affiliate links. If you make a purchase by clicking on an affiliate link, I may earn a small commission at absolutely no additional cost to you. You can view my complete affiliate link policy HERE.
HOW MANY DIFFERENT WAYS CAN YOU MAKE SOAP?
If you are interested in melt and pour soap basics it is important to know how it differs from other types of soap making. There are four basic categories:
- Cold process
- Hot process
- Rebatch
- Melt and Pour
While discussing each one in lengthy detail exceeds the scope of this post, here are some of the main differences:
Cold Process Soap
Cold process soap is the most traditional, labor, and time-consuming method of soap making. It is the preferred method of soap artisans who want as much control over the process as possible. This way of creating soap allows for individualized choices in oils, various plant butters, and other natural add ons such as fruit and vegetable purees and milk (cow, goat, donkey, etc.).
As the name states, this way of creating soap does not use heat and the resulting product has to cure for at least 30 days before it can be used. The use of potentially dangerous hydroxide lye and the need for very exact measurements make this process something that is best learned in a class setting. Consider the cold process if you are very serious about soap making and want to sell your products down the line.
Hot process soap
Like cold process soap, hot process requires the use of hydroxide lye, but the saponification process is sped up by the use of heat, eliminating the need for a long cure time. This method only requires a cure time of about 12 hours before the soap can be used. That is quite the time savings compared to 30 days! Unlike cold process, the use of fresh ingredients is not recommended as they may scorch and will spoil when the soap is stored.
The process of making soap in this fashion results in a mixture that resembles the consistency of mashed potatoes before it is cured. It’s perfect to achieve a rustic-looking end product but makes it more difficult to achieve swirls or layers. It is also not recommended for embedding as the consistency is too dense.
rebatch soap
Rebatching soap is a great way to salvage cold process soap that did not turn out well. As such it is essentially a combination of the two above described techniques. Unless you are already making soap from scratch, you likely will not be interested in this approach.
This article on the Pros and Cons of Soap Making Methods dives a little deeper if you are looking for more detailed information on each process.
melt and pour soap
Melt and pour soap has a number of benefits over the previously mentioned ways of creating your own soaps. The most important is, of course, that rather than making your soap base from scratch, all of the hard work is already done for you.
It has a number of advantages that make it the perfect method for anyone who wants to dip their feet into soap making without having to worry about using chemicals or waiting weeks for the finished product.
Melt and pour soap base is available to be customized in a great number of different formulas in clear as well as opaque versions. And while this ready-made product doesn’t allow for the level of customization that cold process soap offers, you can simply choose the pre-made soap base that suits your needs best.
Clear versions include glycerin, honey, aloe vera, and hemp soap bases well suited for vegans. Opaque versions most can be commonly found as shea butter, goat milk, donkey milk, and oat. You can usually find a limited selection at most popular craft supply stores. Here are a few of my favorites you can easily order online.


Another benefit of melt and pour soap is that it sets and hardens relatively quickly and has no cure time. If you are looking for soap you can use fairly soon, it’s perfect for you. Technically you could just cut up an M&P soap block into bars and use it as is. Practical, but boring.
As a finished product that does not need to cure, melt and pour soap is not suitable for the addition of fresh ingredients like cold process soap. But as you will see there are plenty of ways to customize the soap to make it your own. The thinner more liquid consistency is not ideal for embedding heavier additives but makes it a great candidate for layering colors, marbling, and swirls.
Like other types of soap, melt and pour soap can scorch which makes the base thick and quite difficult to work with. Not to worry, I will show you the safest way to melt it and work with it.
Unlike some other types of soap, cleanup is a snap. Just rinse all containers and tools once you’re done and you are ready for the next time! My favorite part? The tools and supplies for this craft take up very little space and are easy to store!
For access to my FREE Resource Library filled with lots of printables created just for you and weekly updates, be sure to sign up here.
BASIC TOOLS AND SUPPLIES FOR WORKING WITH MELT AND POUR SOAP
One of the main reasons that attracted me to working with melt and pour soap is that it requires no special tools. Actually, you can find pretty much everything you need inexpensively at the dollar or thrift store.
It is important to note that any equipment used for soap making should never be used with food!
So, let’s dive right in shall we? Here is all you need along with some useful options.
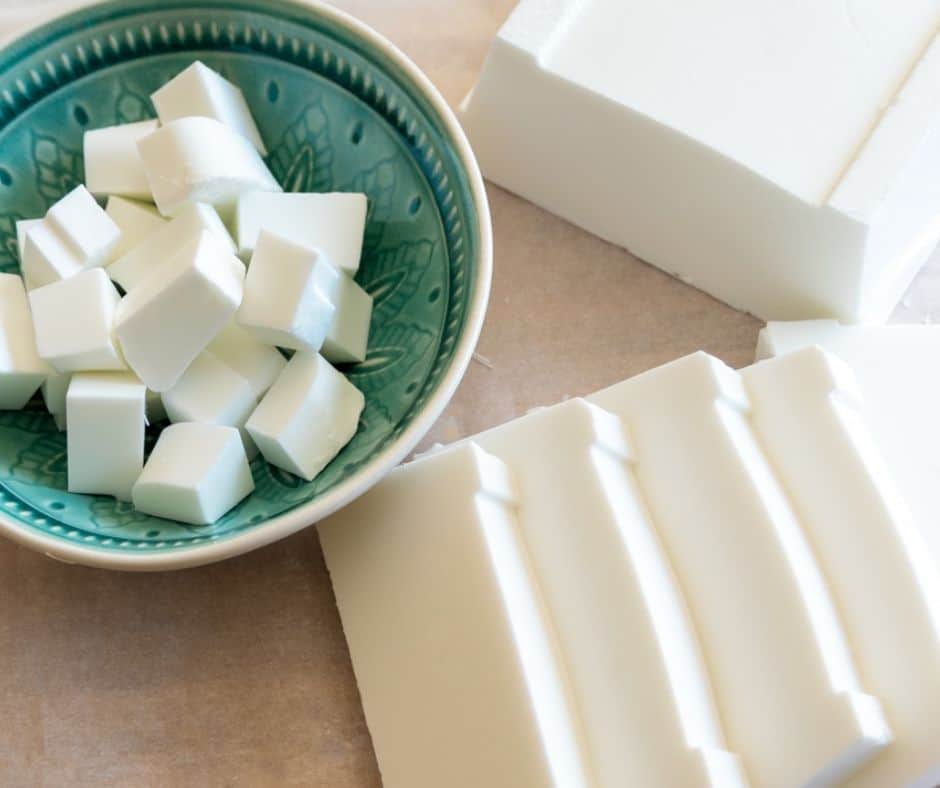
- Block of melt and pour soap
- Heat-proof glass measuring bowl
- Measuring cups and spoons
- Small silicone spatula or large wood popsicle sticks
- Large Kitchen knife
- Optional: large rimmed cookie sheet
- Silicone soap molds or loaf soap mold
- Essential and/or fragrance oils (safe for soap making) – read my Guide to Buying Essential Oils
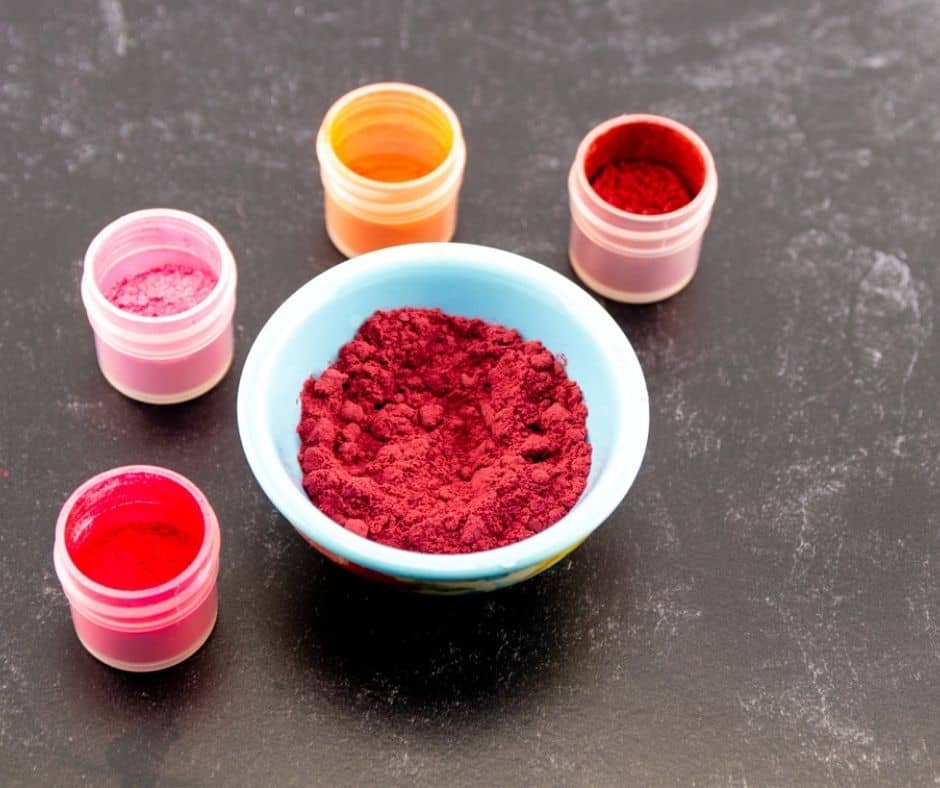
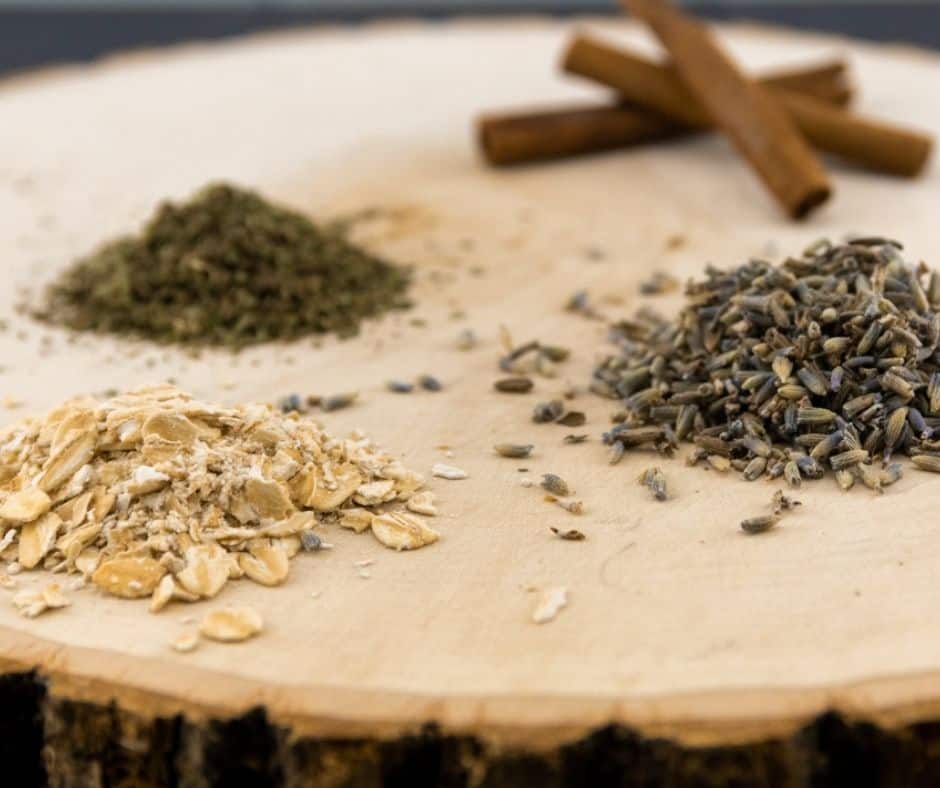
- Colorants: natural – fine fruit or veggie powders, activated charcoal, cocoa powder; synthetic colors specifically for soapmaking; cosmetic grade mica powders (for color and shimmer)
- Other mix-ins like finely ground herbs, dried lavender buds, ground oats, pumice
- Small plastic cups for mixing colors
- Glycerin and/or 99% rubbing alcohol for mixing color
- 99% rubbing alcohol* in a small spray bottle
- A heat source like a microwave or double boiler on the stovetop
- Well lit protected work surface
- Apron or old shirt to protect clothing while you work
- Plastic wrap or parchment paper to wrap your finished soap in
Of course, the tools listed here are a one-time investment. Other items like colors and essential oils last a long time!
* 99% alcohol evaporates much faster and is the best choice for working with soap. 91% will also work in a pinch and can be used in other craft projects as well. The water content and much slower evaporation of 70% rubbing alcohol is too high and is best reserved for making hand sanitizer spray.
Great sources for soap making supplies
Some basic but limited supplies are available at most major craft and hobby stores. For added savings take advantage of sales and coupons when shopping.
For those without easy access to brick-and-mortar stores, there is no need to despair. Several online retailers offer everything you could ever need. Here is a shortlist of my favorite ones.
The bottom four sites are also a good source for additional information, inspiration as well as recipes.
IMPORTANT CONSIDERATIONS BEFORE GETTING STARTED WITH MAKING MELT AND POUR SOAP
Even though this project is beginner-level simple, there are still a few important considerations before you get started.
When I created my first batches with melt and pour soap, they turned out okay. The soaps did their job, but they weren’t exactly something I would have wanted to share with the world. I want you to do much better than that.
work with a mangable batch
As tempting as it may be to cut up and melt an entire 5 lb block of soap in one sitting – don’t do it. The beauty of melt and pour soap is that you can cut off a chunk and save the rest for another time. Just wrap the leftover block tightly in plastic wrap. Working with smaller batches gives you much greater control.
Not sure how much liquid soap you will need for your molds? There is an easy, low-tech way to figure out the volume. Fill one of the mold cavities with water, then drain the water into a measuring cup. Now multiply by how many cavities your mold has.
Most of my molds hold 4 oz for each soap and that seems to be fairly standard. The end result should be a soap that is large enough to last a while. Too little and they will be used up too quickly, too large and they might be difficult to hold on to.
Use the proper amounts of add-ins
Determining proper amounts can be a bit tricky but there are some basic guidelines that will ensure that your finished soaps turn out well. As a rule of thumb never add more than 1 tablespoon of oils or other liquids per one pound (16 oz) of soap. More will cause the soap to ooze the excess liquid.
Mix colors and other additives prior to adding to the soap liquid and add a little at a time until you have achieved the desired effect. If you choose to add mica powder – a little goes a long way! You can always add more if desired.
THE PROCESS OF MAKING SOAP WITH MELT AND POUR FORMULAS
As we discussed, the process of making soap with melt and pour soap is not a difficult one. It is even something you can do with older children. Just be sure to supervise closely especially when working with hot liquid soap. Getting everything ready and set up at first, will make the whole process run much smoother, I promise! It’s all about working smarter not harder!
Just be sure to read this post completely to the end to get the full benefit of how the process works before you try it out. You can find my favorite tips and tricks at the bottom.
Setting up
Good preparation and setup are key to making the soap-making process run smoothly and cleanup easy when done. Begin by gathering all of the tools and materials needed from the list above.
Cover your work area with thick craft paper or several layers of newspaper. You will want to work fairly close to your heat source, so this usually means using a kitchen counter as your work surface. My favorite tip is to use an old rimmed cookie sheet as a tray to set the molds on. Be sure to line it with parchment paper or aluminum foil to catch any drips! Even though this type of soap hardens relatively quickly, you may need to move the filled soap molds before the soap is fully set. Placing them on a rigid cookie sheet allows you to move them even before the soap has hardened fully.
If you are creating soaps that include any add-ins, make sure that everything is ready and within easy reach before you start to melt your soap base. This includes mixing colors, getting any herbs or other add-ins ready, and measuring any fragrance oils you want to add.
Decide on how many soaps you plan to make, then measure the ingredients you will use. I will talk more about suggested amounts for various ingredients in a bit.
MELTING THE SOAP
Melt and pour soap is fairly easy to cut into chunks. To allow for even and faster melting, work with smaller batches. 1 -1/2 lbs at a time is plenty. Remember, you can always add more.
Melting is easily accomplished in a heat-proof bowl in the microwave. Most soap manufacturers suggest starting out microwaving with 30 seconds and then continuing with 10-15 seconds. Stir well after each time you microwave. You will see that it takes surprisingly little time to melt the soap.
Alternately you can gently heat the soap in a double boiler.
Melt and pour soap has a fairly low melting temperature of between 120 -125 degrees Fahrenheit (around 50 degrees Celsius). If heated too much it can scorch, leading to the soap seizing up and becoming difficult to work with. It may also discolor.
Be extra careful when handling the container with the liquid soap. It will be very hot! I love using a large measuring bowl with a handle to keep from having to hold the rim with oven mitts on my hands.
Once the soap is melted completely it is time to continue on to the next step.
pouring the liquid soap
In its liquid state, melt and pour soap has roughly the consistency of thick cream. Now is the time to add colors, other add-ins, and finally essential or other fragrance oils. Adding oils too soon while the soap mixture is at too high a temperature will dissipate their scent. You can also add essential oils (about 3- 5 drops per 4 oz bar) as soon as the soap is poured. Just be sure to stir them in well. Also, consider how this will work with your soap design if you are using layers or creating a marbling effect.
Finishing your melt and pour soaps
Once you are done pouring all you have left to do is to wait for your soap to fully harden. This usually takes around 2 hours depending on the ambient temperature. You can speed up the process by moving the molds into the refrigerator once the soap has set for about 30 minutes. That is where the tip with the tray I mentioned above comes in handy!
If you have more soaps to make, simply repeat the process. If not, it’s time to clean up!
HOW TO STORE AND USE YOUR FINISHED MELT AND POUR SOAP
When properly stored finished melt and pour soap lasts a long time. We have used soap bars that were a year old at our house and they were fine. Of course, I hope that you store yours in a way that you can find them a little easier!
As a glycerin-based product, all M&P soap will “sweat” a certain amount. Wrap your soap tightly in plastic wrap or parchment paper (my favorite way) and store it in a cool dry place.
To use your soap creations in the shower or bath, work up a nice lather with a shower pouf. If you have stayed away from bar soap because you love the lather of body wash, I can assure you it works just as well!
While it is your personal choice, we prefer not to use bar soap for washing hands where several people will be scrubbing up. Liquid soap is the preferred option for keeping germs on hands in check.
Allow your bar soap to dry out well between uses by keeping it on a soap holder that allows airflow all around. Look for designs that can be taken apart for easy cleaning.
ADDITIONAL TIPS AND TROUBLESHOOTING COMMON PROBLEMS WITH MELT AND POUR SOAP
Bubbles forming on top of the soap
While this does not interfere with how well your soap works, it can be unsightly. If this is an issue for you, make sure that the soap is at the proper temperature when poured.
To nip bubbles in the bud, give the top of the freshly poured soap a quick spray with 99% rubbing alcohol spray.
color is not dispersing well or fading
To ensure even distribution of color throughout your finished soap mix your coloring agent (synthetic or natural) well with a small amount of glycerin or 99% rubbing alcohol. There should be no lumps of color. Add the color mixture to your liquid soap and stir well until completely incorporated and even.
While consistent color throughout may be desirable, streaks and marbling look great as well!
To prevent colors from fading, bleeding, or staining only use synthetic colors that are specifically made for use in soap. Natural colors, another great choice, tend to be more muted. Keep that in mind when choosing your colors and coloring products to achieve the desired look.
Food coloring is not a good choice as the color may stain. Food colors also tend to blend together and fade.
clear soap turns cloudy
The whole point of choosing a clear formula is for its transparent effects, so it can be quite annoying when the mixture turns cloudy. Sadly, once it turns opaque, there is no way to transform it back to its original clear state.
What turns clear soap cloudy? The main culprit is usually stirring it too much and too vigorously. Much like whipping cream, stirring incorporates tiny air bubbles that stay suspended in the soap giving it a cloudy appearance.
Too much heat can also turn clear soap, so again, lower, gentler heat is the way to go.
finished soap is “sweating”
A small amount of sweating is normal. As a product that is basically finished before you begin working with it, melt and pour soap can only hold so much additional volume. Anything more is expelled. Think of the soap as a wet sponge. Once it is saturated, it cannot hold any more water than it has already absorbed.
For best results, never add more than 1 tablespoon of additional oils or liquids per pound of soap. This includes all oils like olive, jojoba, Vitamin E, and essential or fragrance oils.
The general recommendation for essential oils and fragrance oils is to add 3% per pound, which amounts to approximately 0.48 oz.
added ingredients won’t disperse evenly
The much thinner liquid consistency of melt and pour makes it a fun medium for creating layers, swirls, and marbling. But it also allows slightly heavier ingredients to sink to the bottom of the mold easier. You can counteract this effect by suspending some of it in the soap and mixing it very thoroughly before pouring. You can also pour the same mixture into layers.
Suspension soap base is available specifically formulated to hold larger particles in place.
pro tips
- Buy clear glycerine soap base and add white titanium dioxide pigment to clear soap if you prefer a more opaque look.
- Spray intricate soap molds with lots of details lightly with 99 percent isopropyl alcohol to allow for a crisp release of the soap.
- Use Vanilla Color Stabilizer to prevent discoloration with the use of vanilla fragrance oil
- Only use high-quality essential and fragrance oils as cheap oils may not be pure and can contain unwanted chemicals
FINAL THOUGHTS
Creating custom soaps from melt and pour soap bases is a fun way to make a body care product you will be proud to use yourself or give as gifts. Inexpensive tools and materials that can also be used to make other products are an added budget-friendly bonus. If you haven’t given it a try until now, I hope my melt and pour basics have given you all of the information and the motivation to give this fun and useful craft a try!
It’s great that you mentioned that a finished product that does not need to cure, melt and pour soap is not suitable for the addition of fresh ingredients like cold process soap. My sister and I want to start our own soapmaking business, offering customized soap for our customers. I’ll share this with her later to discuss the process, and we want to theme it for fun, like Hand Crafted Penis Soap. Thanks for this!
Good luck with your business!
If you use 3 percent per pound that does not come up to 0.25 oz it comes out to 0.48 ounces. 16 x 0.03 = 0.48 ounces of oil to use per pound
Frank, thank you so much for reading my post, and taking the time to point out my mistake! I have corrected my (inexplicable) mathematical error. Have a great day.
Can u combine different kinds of soap base? For instance, Oat & Honey or Shea butter & Aloe Vera or????
I am just starting out in soapmaking
If you are just starting out, I would recommend sticking with one kind. I have not mixed different kinds of soap, but you can certainly layer it for fun effects.
I am interested in using a loaf mold, can I sprinkle the micro color on the top of the soap and swirl it with a pop sickle sick? Thank you
Yes, you can certainly try that. You would have to work rather quickly because the soap sets up quickly.
Hello. Thank you for such an informative blog. We are making soap as favors for our daughter’s wedding. We live on a dairy goat farm and want to make dairy goat milk soap. The cold process became too much for me. I have found some melt and pour soap base that is goat milk based 🙂 My question is with keeping the soap for a few months. You suggested wrapping in parchment paper. Are you taping this tightly, loosely wrapping, or?? Also can I stack the bars once they are wrapped to store them until the wedding? Finally we would like to make a label to add to the soaps for the wedding. We are thinking of getting some kind of band to put around them or to put them in a muslin bag to hand them out. Which would be better for this type of soap? I noticed you mentioned sweating so I am wondering if the raw bars with a band would work?
Hi, thank you for your interest in melt and pour soap. I have found that loosely wrapping the soap in parchment works well. Our soap usually gets used fairly quickly, so I cannot give you a good idea as to how long it will last. I would suggest storing the soaps unwrapped in a plastic container, then adding the wrapper and label a few days before the wedding. I hope this answers your questions. Good luck!
Hi! I recently made a melt and pour soap and it’s not mushy but it’s not as hard as a store bought bar. Is this normal? (Side note: I did add some additives)
I find that to be true as well. The more you add, the more the consistency will change.
Great article! Question. I used clear glycerin melting pour 2 weeks ago and made a beautiful transparent soap that had dried flowers in it. I went to check on them today and they are no longer transparent. They’re very murky and cloudy. Is it possible that the coloring in the flowers somehow tarnished the clear transparent look? I want to make more because they were so pretty but I can’t sell them if they turn murky and no longer look like the original product. Thank you for your help!
Sadly, I have had the same experience. I haven’t found a way around this problem.
When you say not to use fresh ingredients in the M&P soap base do you mean like honey and tumeric powder?
No, fresh ingredients refers to anything like flower petals, fresh herbs ets. Tumeric and other herbs, honey etc. are fine.
Can I add boiled rice milk to melt and pour soap? Can it go bad?
I have not tried anything like that. You can always try to add a little to a small amount of the soap and see what happens.