WHY SEW YOUR OWN FACE MASKS?
Even though I wore face masks on a daily basis in my healthcare profession, I never really thought I might need one at home. Well, except for sanding down a DIY project or enameling in my jewelry shop. And like pretty much everyone else, when we were first advised to start wearing masks they were impossible to find anywhere.
So I decided to do what I always do and that is to DIY washable facemasks. The problem was that I couldn’t really find a pattern that was easy to sew, comfortable to wear, and met the recommended guidelines. Those guidelines include two layers of fabric with a filter. I knew that I could definitely design my own pattern based on all of those criteria coupled with my experience in healthcare.
The trick was to make it all as fast and easy as possible. Because, who wants to spend all this time behind a sewing machine?
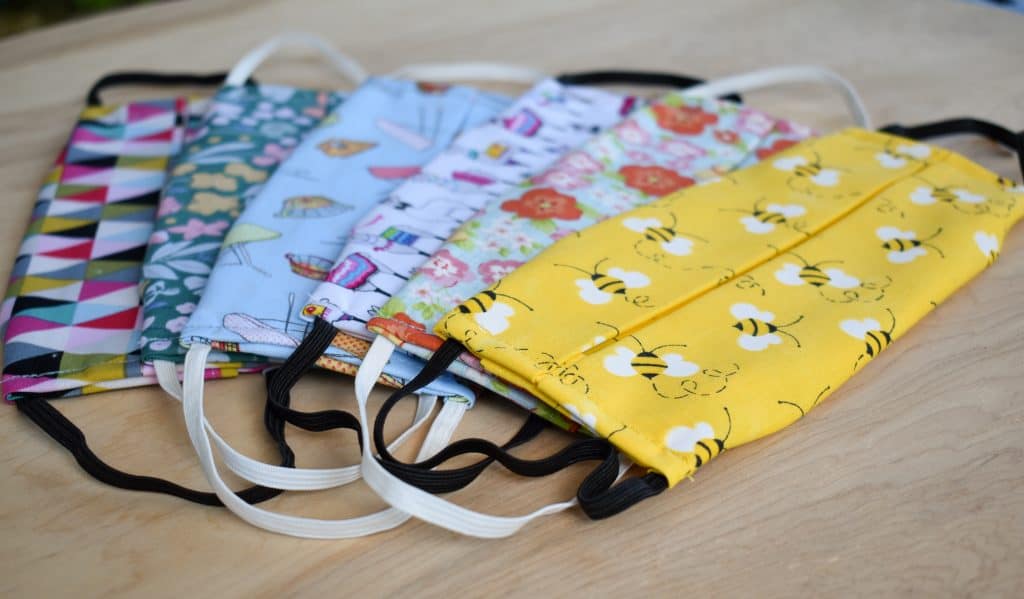
The pattern you see here is the result of much trial and error. In the end, I opted for a mask pattern that consists of one piece of fabric and requires only straight-line sewing. It can easily be adapted for use with straps if elastic ribbon is either not available or not desirable. And while contoured masks look great, they lack the adjustability and ease of sewing I was aiming for.
Check out my post on how to add a nose wire to this mask or any other cloth mask with a filter pocket.
Updated January 2021: Since this post was first published, face masks have become a part of daily life. I have had the privilege of making roughly 1,000 of them as of right now. Please know that I am always committed to providing you with the most updated information available. As a result, I will be revisiting this and other applicable posts often to reflect the latest knowledge. You can also find child-size patterns Easy Sew Washable Masks for Children. Also, be sure to check out my post on how to get the most comfortable fit for face masks.
Before I proceed, I would like to stress that I am in no way claiming that a washable face mask will protect you like an N95 respirator mask. But since their use is essentially limited to medical personnel, a protective cloth face-covering like this triple layer washable mask is a good option for personal use. As a matter of fact, some hospitals were asking private citizens to sew face masks to prevent the depletion of N95 mask supplies.
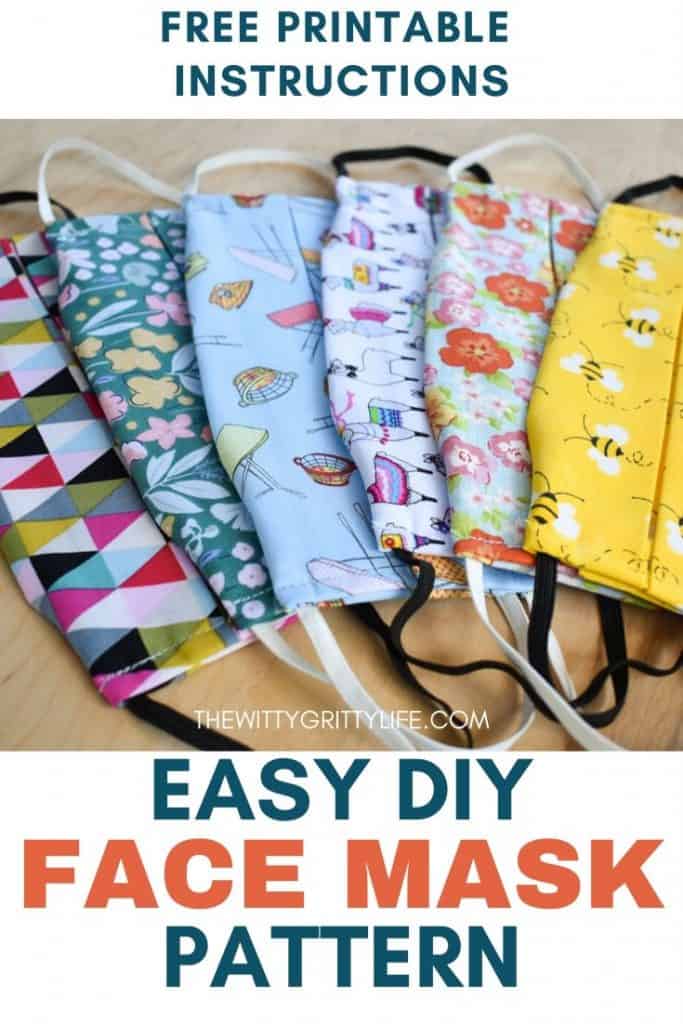
EASY DIY WASHABLE FACE MASKS FOR BEGINNERS
As I mentioned, I worked in the healthcare profession for many years. And during those years I wore many different types of masks. A comfortable fit is as important as filtration. If your mask doesn’t fit well, you will be less likely to wear it. Most medical masks are available in two variations: one with elastic loops, the other with ties. This mask pattern will work with either. The choice is entirely up to you.
basic MASK pattern design
While researching this DIY project, one thing stood out: a mask should have more than one layer, even if it is made from tightly woven fabric.
That is why I concentrated on creating a mask that has three layers, two fabric layers with a removable center (filter) layer. From what I was able to gather on information, the recommendation is that the center layer should consist of something that is not woven, like a dense type of batting, heavyweight t-shirt fabric, even folded paper towels. All will work just fine with my design as you will see.
And third, I concentrated on creating a pattern that is easy to sew with relative beginner skills. You shouldn’t need to be a seamstress to accomplish sewing your own face masks. With my pattern, you need one rectangular piece of fabric and if you know how to sew a straight line, you are good to go.
Best materials for face masks
The next important consideration was the type of fabric. That choice turned out to be relatively easy. Cotton is breathable, comfortable to wear, can be washed in hot water, and is readily available. 300 thread count 100% cotton sheets are a great option.
They are readily available and very affordable. You may even have some on hand already. Or use one of the many fun patterns available at the fabric store and create your masks to match any outfit or taste!
If you prefer to purchase my ready-made masks instead, you can find a variety of colors and patterns in my Etsy shop. Shipping within the US is FREE and new patterns are added regularly.
You can find FREE printable instructions including a way to make these masks with ties instead of elastic and lots of other valuable info in the Resource Library. Just sign up here!
This post contains affiliate links. You can view the entire affiliate link policy here.
MATERIALS NEEDED TO SEW YOUR WASHABLE MASKS
- cotton fabric (should be tightly woven) – prewash
- cotton batting*
- medium weight cotton thread in your color of choice
- 1/4 inch braided elastic (may use 1/8 inch) cut to 7″ or 18 cm – 2 for each mask
*see other options for liner inserts below
Tips: For this purpose I found cotton quilting fabric to be ideal. You can buy it by the yard or in color-coordinated “fat stacks” with each piece of fabric measuring about 21×18 inches. This makes cutting fabric to size super easy. If you plan on making a number of masks, 300 thread count cotton sheets are an ideal choice. It is soft and breathable and can be found in many colors.
If you are using patterned fabric stick to a pattern that can be used in any direction. This makes cutting and sewing much easier and faster.
Braided 1/4 inch elastic is already in short supply. If you can’t find any elastic right now, don’t despair! You can make these masks with coordinated cotton ties. You can find instructions to do that in the complete PDF in the FREE Resource Library.
TOOLS FOR MAKING TRIPLE LAYER MASKS
- sewing machine (use a needle suited for heavier fabric)
- sharp scissors
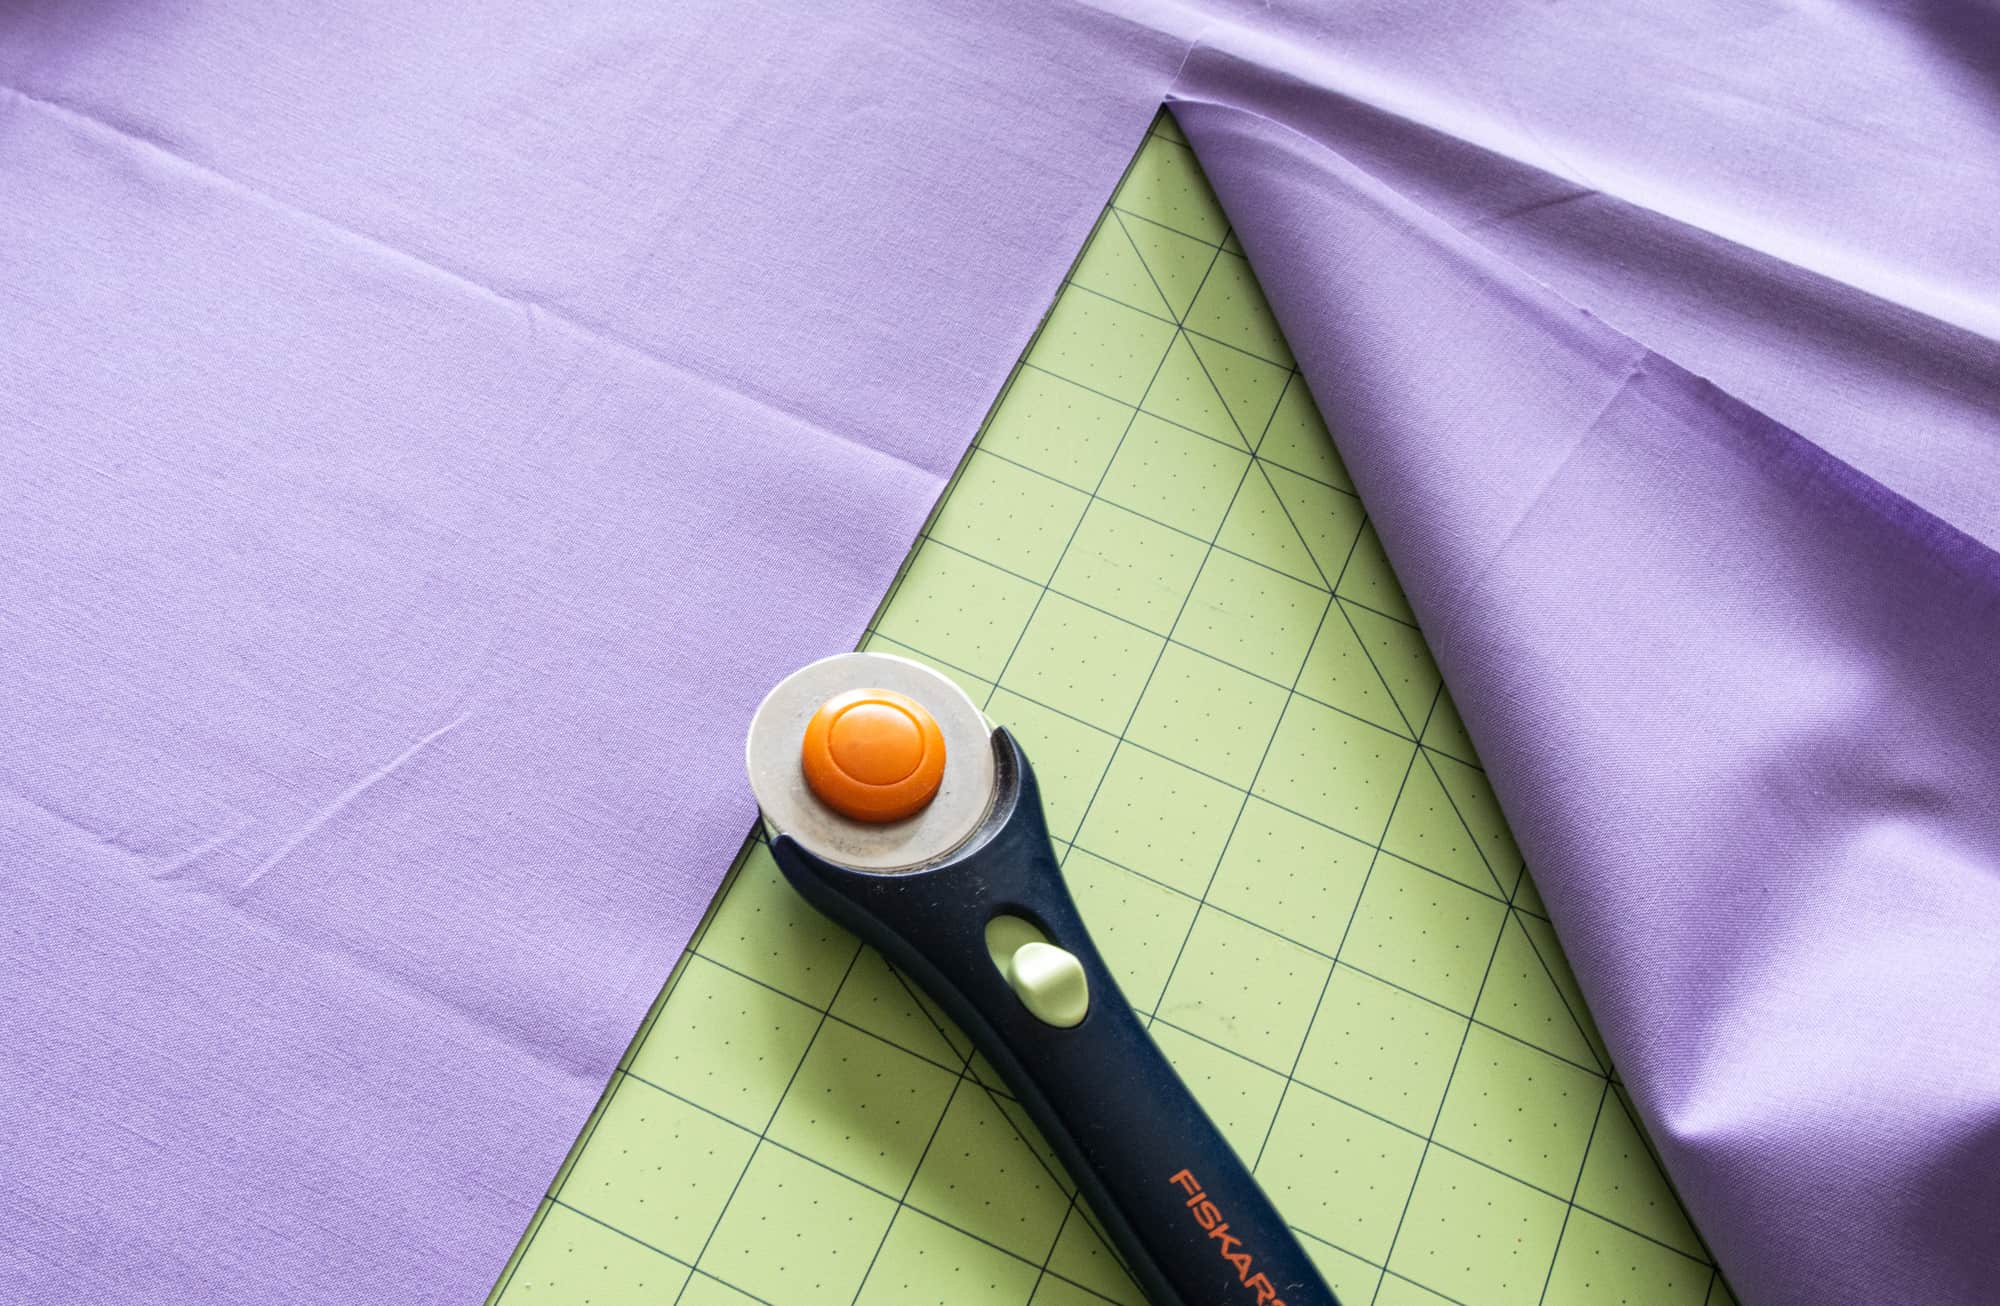
- rotary cutter and self-healing mat
- large quilting ruler
- iron, ironing board
- pins
Tips: While a rotary cutter and self-healing mat are not absolute must-haves, I highly recommend both. It makes cutting fast and accurate especially when combined with a quilting ruler. And both are great tools to combat hand fatigue.
step by step Instructions for Sewing Face Masks
- Cut the fabric so it measures 16″ x 10″ (approximately 40 cm x 25 cm)
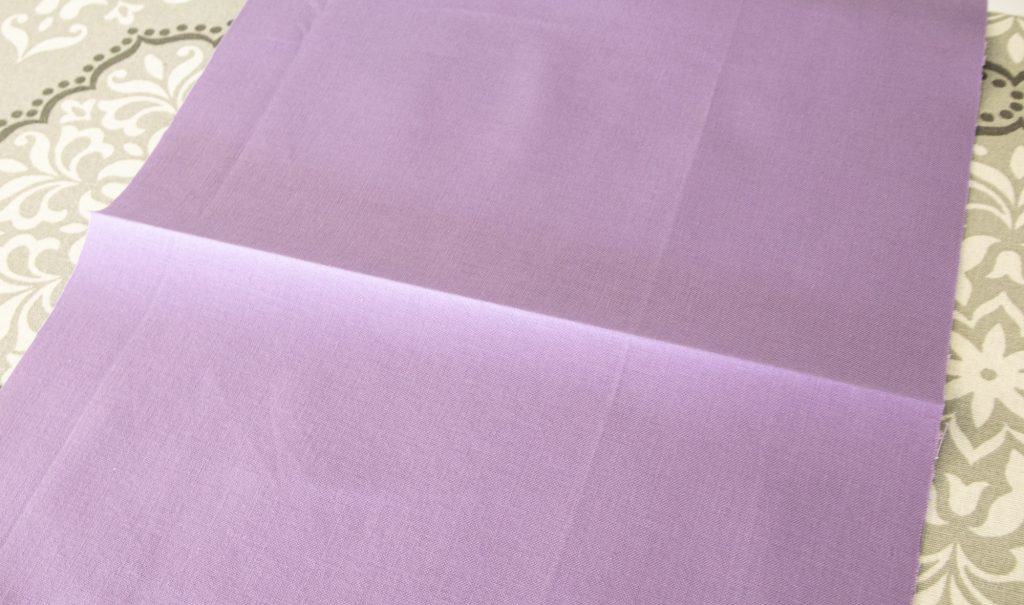
- Press flat, then fold in half horizontally. It should now be 8″ x 10″ (20 cm x 25 cm)
- Press the fold and open back up
- On either side of the pressed fold measure 2″ (5 cm)
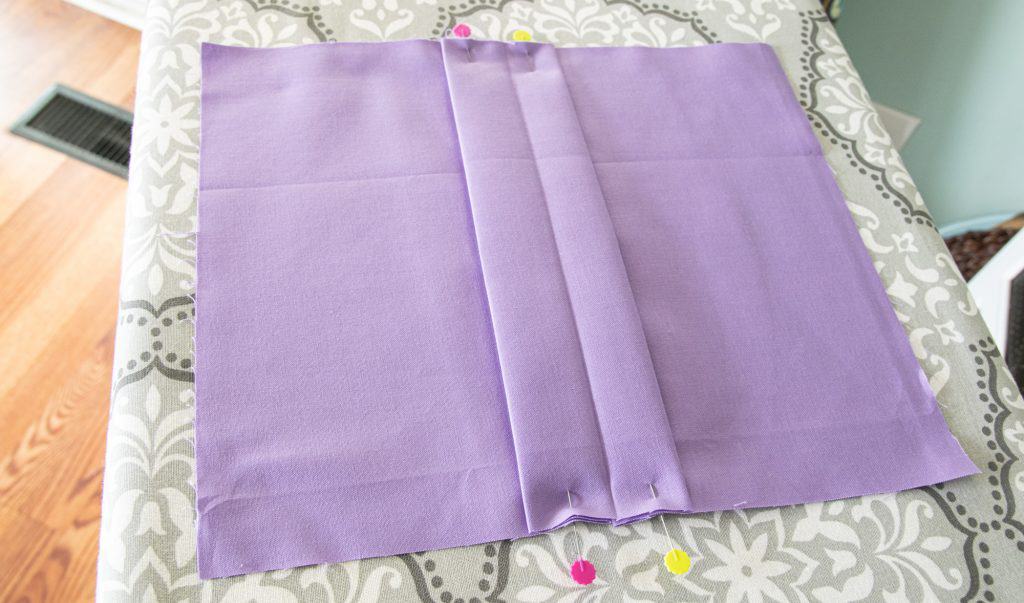
- From the 2″ (5 cm) mark, fold the fabric so it lines up with the pressed center line, repeat with the other side
- Press folds in place and pin
- Double Roll and press hems (1/4″ or 0.5 cm) on both ends in place, pin if needed (I have found that it is not really necessary if pressed well).
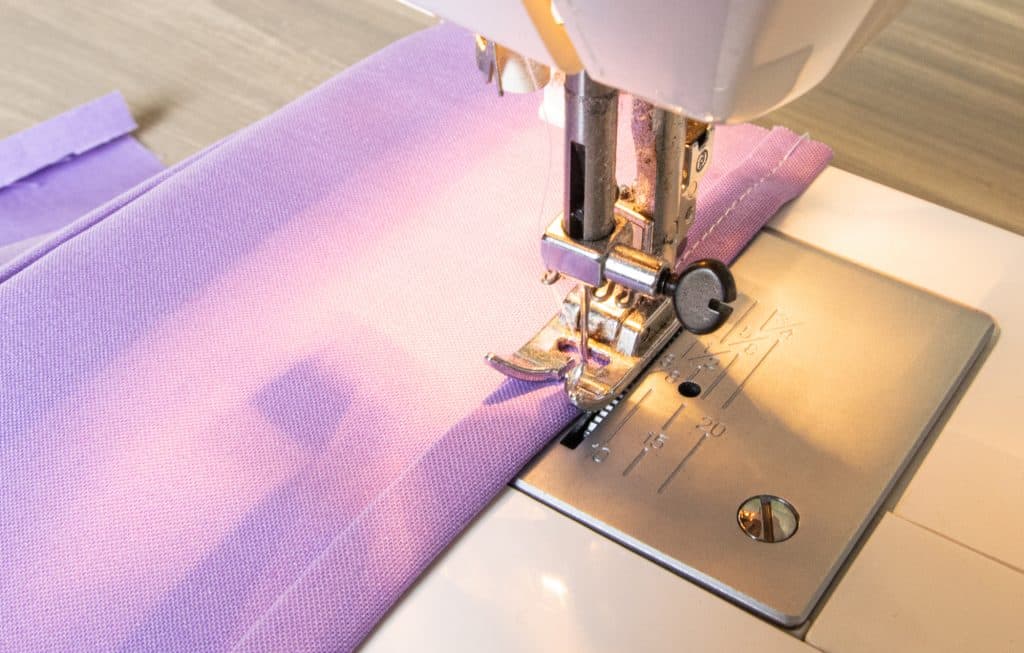
- Stitch over centerfolds with a 1/4″ or 0.5 cm seam allowance on both sides to hold in place
- Stitch hems
- Press entire piece to set hems
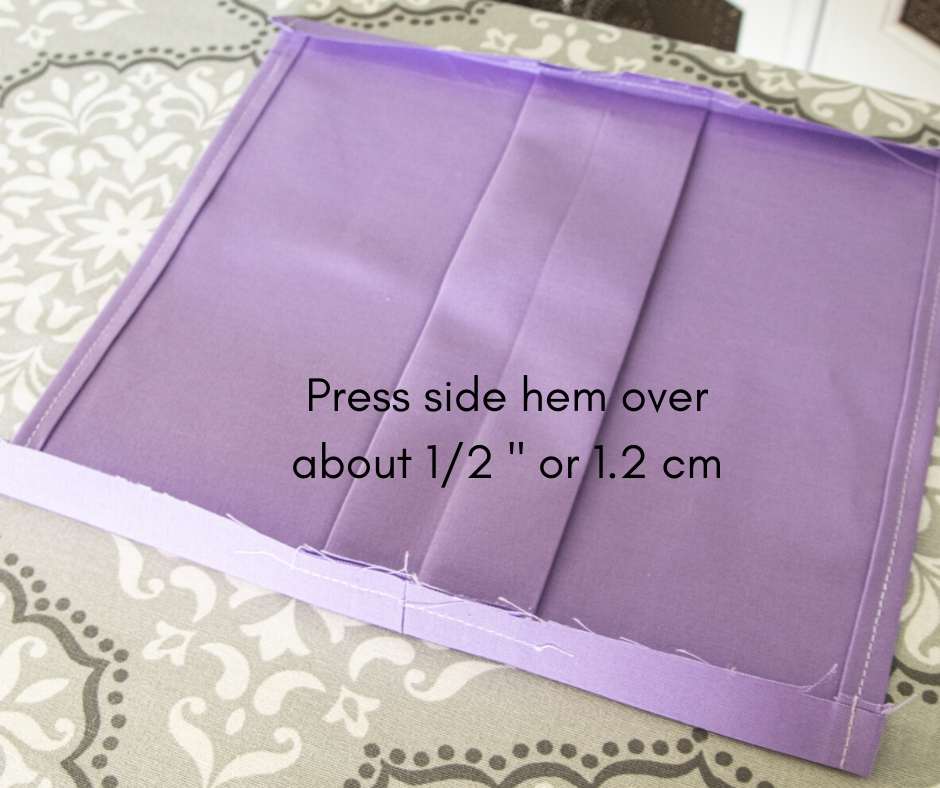
- Now roll in both sides about 1/2 inch 1.2 cm and press into place
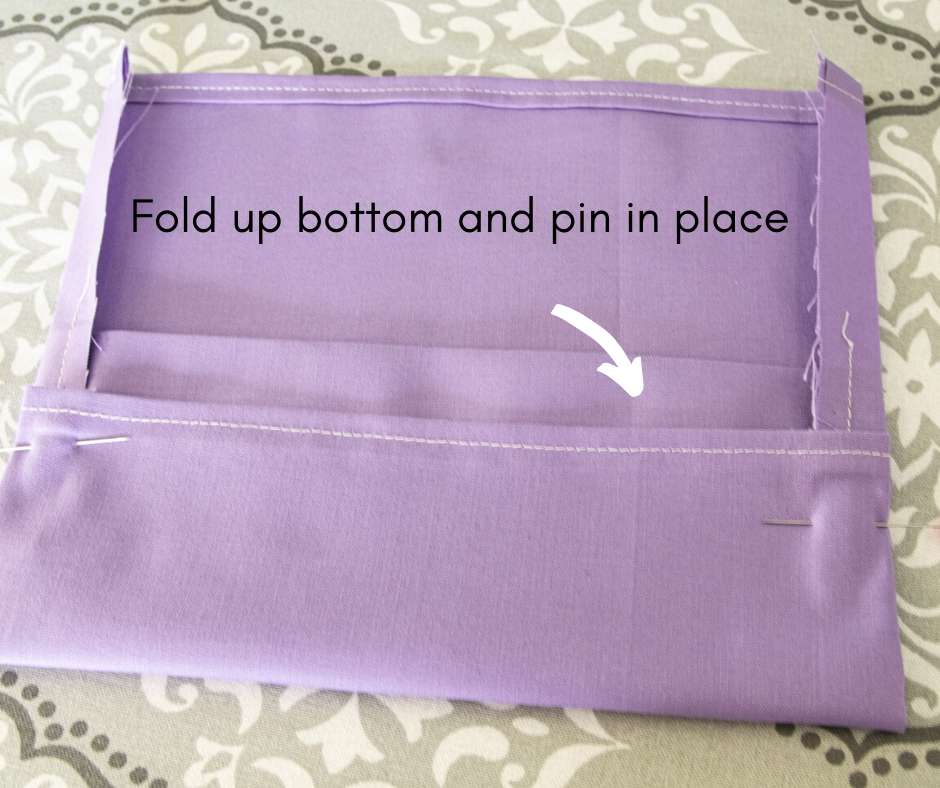
- Fold each end in towards the middle so they overlap slightly (check the front, the fold should be in the center
- make sure the pressed seams stay aligned
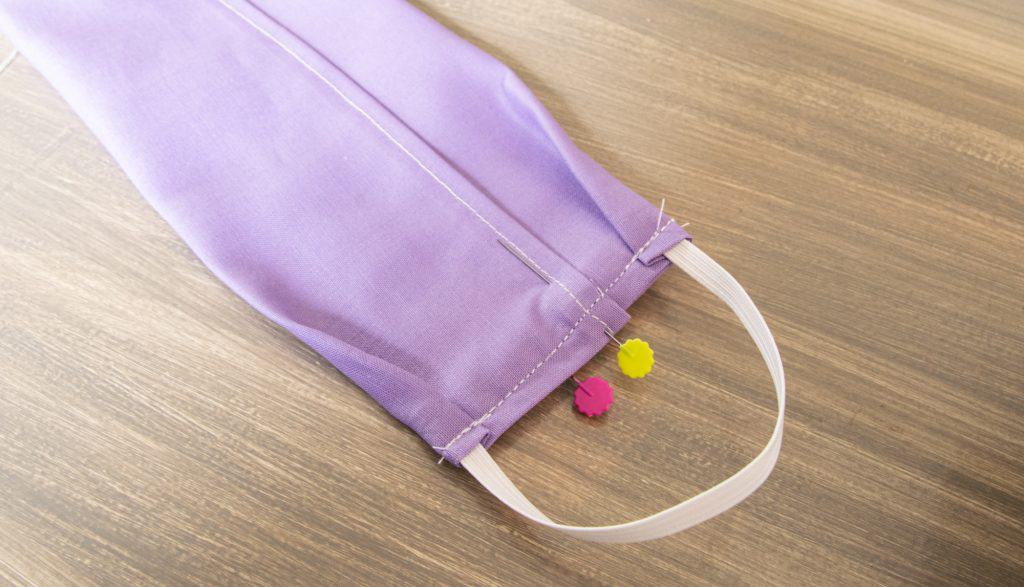
- with the opening facing up, place the end of elastic or fabric tie, align and roll so the tie is covered
- stitch into place (back-stitch to secure) continue stitching until 1″ (2.5 cm) from the other side
- insert the other end of your elastic or the second fabric tie, roll and secure like the first
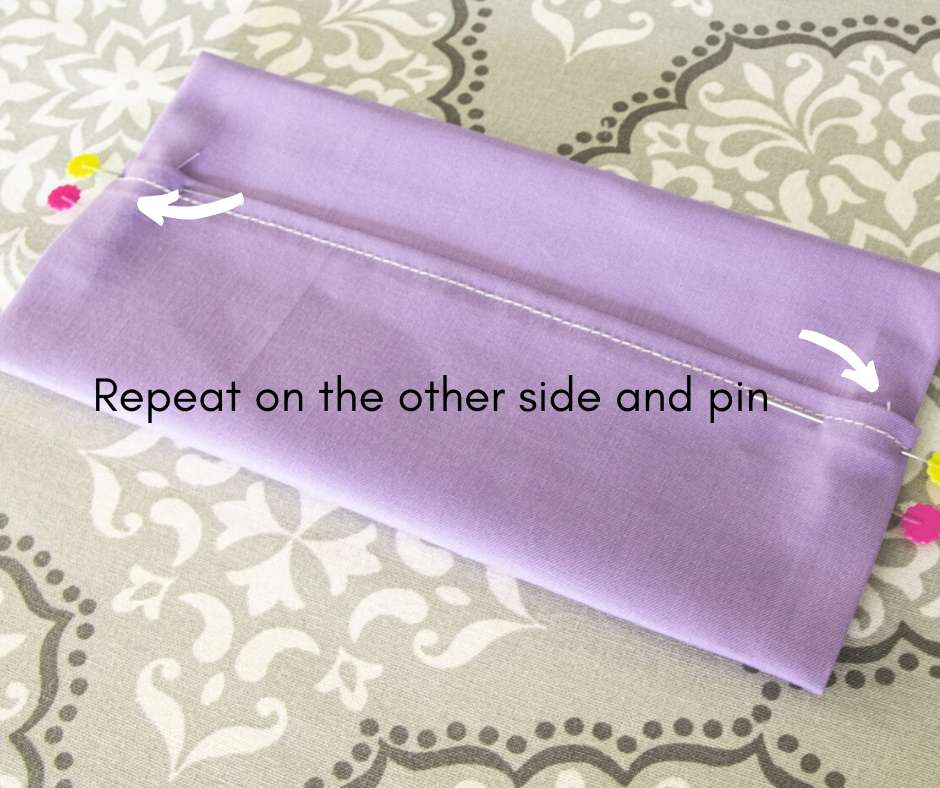
- repeat on the other side
A CLOSER LOOK AT THE STEP BY STEP INSTRUCTIONS
Begin by measuring and cutting your fabric. I used plain fabric here so you can see and follow each step clearly.
Fold the cut piece in half horizontally and press the centerfold as a reference mark.
Create about a 1″ – 2.5 cm fold on each side of the centerfold, press and pin in place.

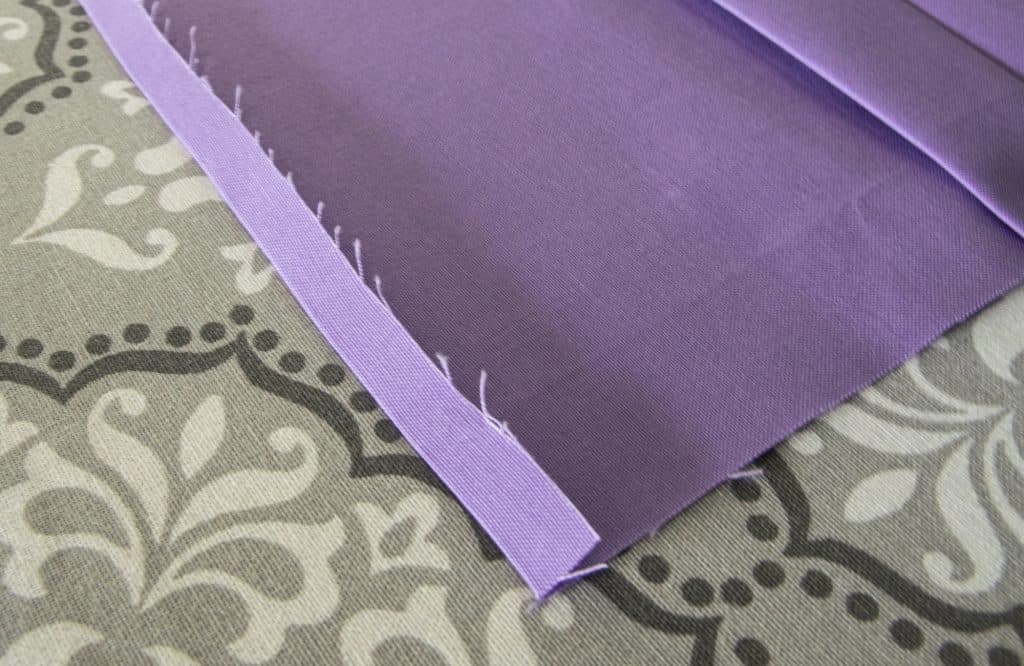
Here is what the pleat looks like from the back (wrong side of the fabric):
Next roll and press the seams at each end over 1/4″ 0.5 cm
Stitch in place. If you press the seams down well, you shouldn’t have to pin. The seam is about the same width as the pressor foot, which makes sewing down the center much easier.
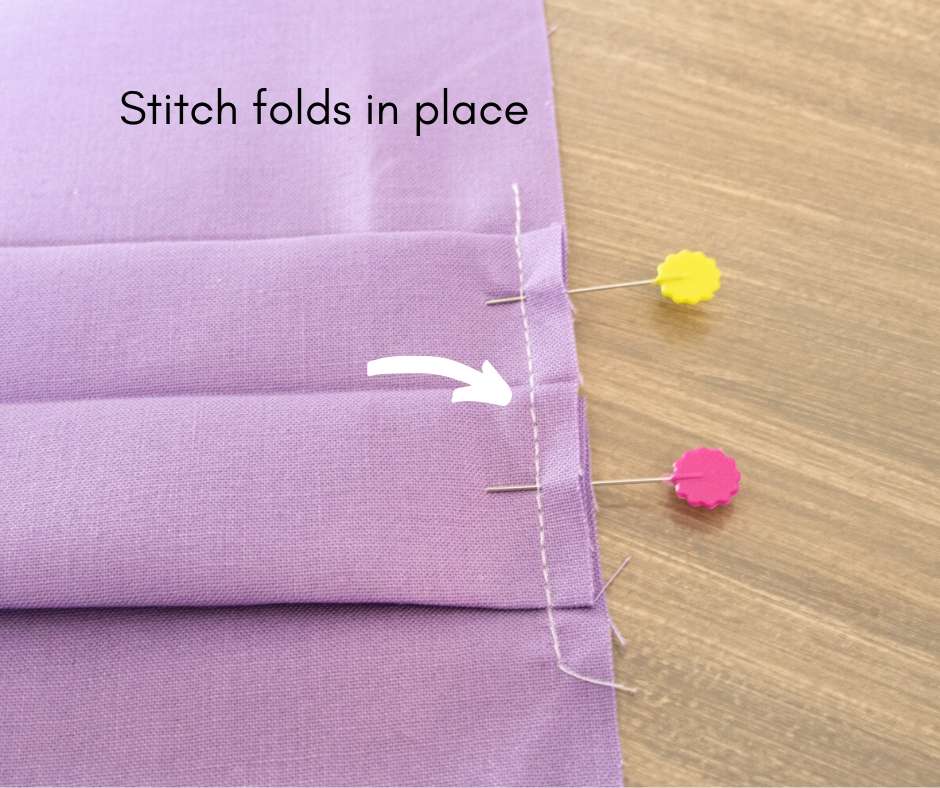
TIP: Before pinning, flip the mask over to make sure the centerfold is actally in the center! If you prefer not to pin, press the entire piece well before the final sewing step.
Inserting the elastic as shown and rolling it over gives the finished mask better fit.
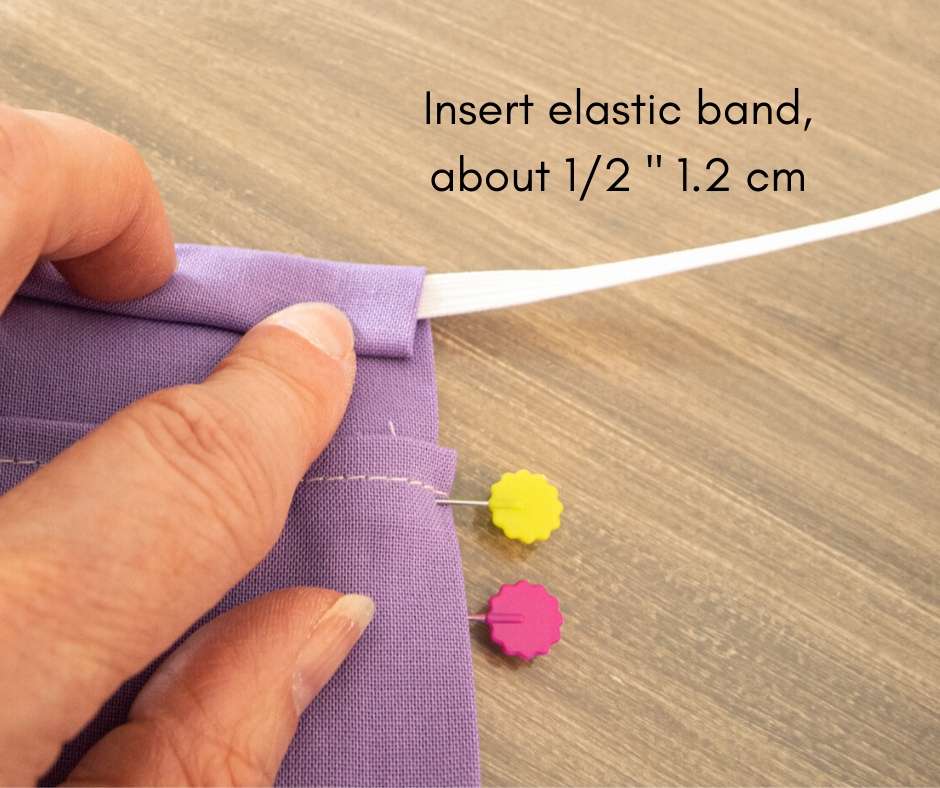
Stitch the elastic ribbon in place and anchor with backstitches. You want them to be very securely in place. Test by pulling on them.
Repeat on the other side. Make sure the elastic ribbon is not twisted!
Pat yourself on the back, you just made a washable face mask!
The finished mask using the measurements above should be 9″ (22 cm) by 4 – 4 1/2″ (10 – 11.3 cm). You may need to adjust your measurements to fit your needs. To create smaller sizes be sure to check out my post on how to make child-size masks.
Since this post was originally published, various liner options have become available commercially. At this time I recommend PM 2.5 carbon filters. Each filter lasts through three days of constant wear, is breathable and lightweight.
Other options include: thin cotton batting or 100% cotton heavy t-shirt fabric cut to size, and non-stick sterile pads.
When you need to wash your face mask, remove the center insert and either discard (if you used non-stick sterile pads) or wash the quilt batting liners in a separate garment bag for delicates. That keeps them neatly together so you don’t have to root through the washer and dryer to find them again.
Each member of your family should have 2-3 masks as they need to be washed regularly. This pattern works well for most adults. Again, if you need to make masks for your children you can find my children’s mask instructions in this post. Full instructions and measurements can be found in the FREE Resource Library as well.
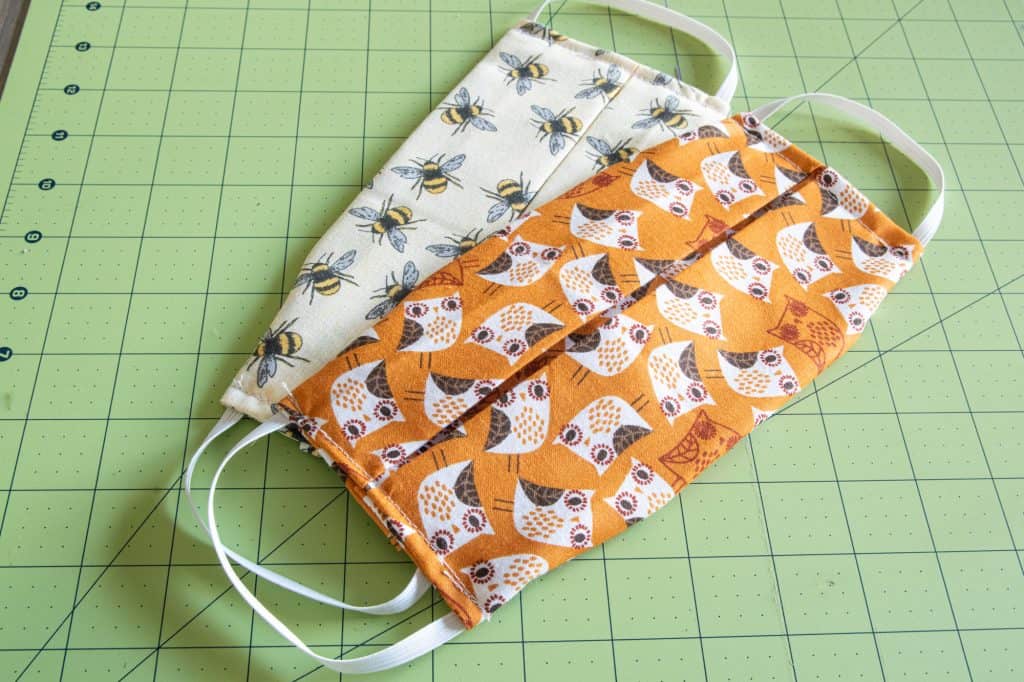
These masks are not only comfortable but also pretty! Choose a cute pattern and inject a little personality into what would otherwise be a fairly boring accessory.
For additional tips and tricks on how to make your face masks fit as comfortably as possible, be sure to to check out this post:
HOW TO GET THE MOST COMFORTABLE FIT FOR YOUR FACE MASKS
additional Face mask tips
You may notice that some types of elastic can be a little stiff and tight the first few times you wear your mask. It will relax with wear and after washing. If you don’t have elastic on hand or if you prefer ties, ribbon is a good option for ties. Insert a 16″ (40 cm) long and 1/4″ (.75 cm) wide ribbon in each corner of the mask.
For a more snug fit around the nose and chin, you can add elastic to the inside of the mask along the center edges.
Wash your masks regularly and replace the liner with a clean one daily (see options above).
Press your masks with a steam iron to sanitize them between washings and after to keep them in good shape.
The past few months have been challenging to say the least. Knowing that there is an illness lurking in the background that could strike at any moment is unnerving. Wearing a mask in public at all times is something that we can all do to make a difference. We can protect others and ourselves. It is a simple choice. Please be safe and wear yours!
If you decide to give this a try, post a picture of the finished result over in our Facebook group! Not a member yet? It is easy to join and the best way to interact and ask questions.
For other useful tips to stay healthy and safe check out these posts:
HOW TO MAKE SURE YOUR FAMILY STAYS HEALTHY THIS WINTER
HOW TO TAKE CARE OF YOUR SICK FAMILY
HOW TO MAKE HAND SANITIZER SPRAY (60 % ALCOHOL BY VOLUME)

Thank you for your kindness, Karin! I’ll be trying to make some face masks in a day or so… The pattern looks quite straight forward, just what I was looking for!
Please stay safe & healthy an again, many thanks for the pattern! Maggie C,of SC
Maggie, you are so very welcome! Please let me know how your masks turn out.Stay healthy and safe!
how much cost for to stich the mask&what is the selling price to customer
The cost to make the mask varies with the material and where you are. If you prefer to buy the finished product instead, you can find ready-made masks for purchase in my Etsy shop at https://etsy.com/shop/thewittygrittylife
Hi Karin,
I signed up but cannot get access to your free printables?
Did you get the welcome E-mail? The password is in the e-mail. If you continue to have issues please email me at [email protected] and we will figure out what is going on.
Very nice and easy to make. Thank you!s
You are very welcome! Happy to help!
Hi Karen, I signed up today but I didn’t get a welcome email. Robyn
Hi Robyn, thank you for letting me know. Make sure you check your spam folder as well. I do see that you signed up, but your account is listed as unconfirmed as of right now. Please be sure to email me if you cannot find your confirmation email in your spam folder and I will resend it.
I got a confirmation email but not a welcome email. Are they separate? I went to thr resource library and it is asking for a password.
The password is in each of my emails.
I really like this mask and would like to print but cannot find print option.
Hi Judy,
You can find the four-page printable version in the Resource Library on Page 2. To enter the password-protected Resource Library, just sign up for my e-mail newsletter and I will e-mail you the password right away.
How do I print your defection?
You can find a the printable instructions in the Resource Library on page one.
Why does the top mask in the picture have only one side folded in corners?
Is there a particular reason for it?
All four sides should be the same.
I signed up and got the password, but I don’t see where it asks for it on your site.
Hi Linda,
You need to click on “Resource Library” in the menu bar at the top. That will take you to the library and prompt you to enter the password.
Thank you.
You are very welcome!
Hi thanks so much for posting. What is the point of the center fold on the front of the mask? I can’t find a photo of what the mask should like like you someone’s face from the front. Thank you!
Hi Caitlin! Great question! The center fold is necessary for proper fit. It allows the wearer to adjust the mask to cover the face from the bottom of the chin to the bridge of the nose. Many of the commercially available masks used in hospitals have folds and pleats. When I designed this pattern, I wanted to make it as simple as possible and incorporating several pleats can be time-consuming and difficult, especially if you are a novice at sewing. To see how a mask should fit, please check out this post by the CDC that explains it.
Can I use felt for a filter instead of batting? I have plenty of cotton quilting fabric, and a ton of felt.
I don’t see why not. The important thing for the liner is that it is made of non-woven material. Felt should work, even a folded paper towel. I list several options for liners in the post.
You should not use a hepa filter in it. I appreciate the pattern! Much easier than the ones I’ve been trying to make. I love the panty liner idea!
Personally, I would not use a HEPA filter, either, but I wanted to present all of the options. There is actual research about the filtering properties of various materials. That is what I based my suggestions on. I am glad you like the pattern!
A hepa filter has glass particles in it.
Some of them do. It is always wise to carefully research options before you choose to use it!
I used felt for a couple of masks. My daughter works in bakery and is working ft. She wore one and said it was very hot and she found it hard to breath.
It depends very much on the fabric also. Be sure to stick to breathable cotton materials. Felt is often made of wool or synthetic fibers. I can also imagine that a bakery would be a pretty warm environment to begin with, which would make just about any mask hot to wear. I wore standard medical masks in my profession for years and even they are hot and difficult to breathe through.
I have tried getting the printable pattern for the face mask but it just gives me the instructions without the printable pattern? I have tried several times but keep getting another email with the password which I copied and pasted but still no printable pattern? What am I doing wrong?
Hi Betty, if you copy and paste the password in the Resource Library, you can find the four-page printable instructions on page one of the library. You would only get another confirmation email if you signed up again.
Hi Karin,
I just finished making a mask using your pattern. Wow…it’s so much better then the previous pattern I had been using. The fit feels so much better and not having to make a bunch of pleats makes it work up faster and no frustration. Thanks so much for designing and sharing your pattern.
Diana, thank you so much! When I began searching for patterns, I found that the pleats were just too cumbersome. I am so happy that you found it to be not only easy to make but also well-fitting. That was the exact goal when I designed this pattern!
Hi I though I’d give your pattern a try. But I’ve come to a halt which I dont get. I’m at the point where you fold the ends to the middle. Mine is really big when they meet in the middle? What have I done wrong! Thanks.
Hi June, make sure that the ends do not meet in the middle but overlap.
I haven’t found the printed pattern for the face mask.
You can find a four-page printable version of the instructions on page one of the FREE Resource Library.
Do you have suggested measurements for a child’s mask? Thank you!
Hi Carole, great question! I didn’t list specific measurements for children, because sizes vary so much. I have made a couple of child-size masks that should fit a child from around 6-10 years old. The length for the material would be 14″ with a width of 8″. You will probably want to shorten the length of the elastic ribbon as well.
This does look simpler than the pattern I’m using. Wondering what is length of elastic? It’s 7” for masks I’ve been making.
I cut my elastic to 8 inches, but you can always try it out to make sure it fits right!
Love this pattern and will start making these right away!! But I’m dying to know where you got the bumble bee fabric from!! I’m obsessed! 😍 Hope all is well and you and your family are staying healthy!
Thank you! I love the fabric with the bumblebees as well! I so wish I could get more. I found it in a pack of quilting fabrics at Michaels. I will try to see if I can find it again and send post a link if I do! Stay healthy and safe!
Karen, Ijoined your site so i could print the instructions for the face mask and nowhere do I see where I can print. Please Help!
The printable instructions can be found on page one of the Resource Library. You need to click on the Library link in the menu bar and enter the pass word. You can find the password at the bottom of your confirmation email.
Karin , I signed up for your website but I can not view patterns etc. I received a confirmation but no pass word. It appears to me that it happens to others as well. Help. Thank you.
You can find the password at the bottom of your confirmation email.
Karin, thank you for posting this. It is a very elegant and simple design. I have worked through a few patterns and had a lot of trouble with sewing through the thick multiple pleats featured elsewhere.. This pattern is very easy to sew.
I added a nose bridge bar in the top which I find useful for those who wear glasses. It worked in easily with your design. I found your measurements much larger than other masks I have made. Ir makes it pretty comfortable for my husband, but I may try to size it down a little for me. The beauty of your pattern/process is it is so easy to adapt.
So thank you! This is an excellent, thoughtful design and I am set to make a bunch.!
Sarah, thank you so much for your kind comment! When I first set out to make masks, I found that a lot of the patterns were just too fussy and labor-intensive. And many of them just didn’t seem suited to someone who might not be very good at sewing. That is why I set out to design my own pattern based on my level of sewing experience as well as that of someone who worked in health care for many years and used to wear masks for a living. It is always a challenge to create a pattern that will fit everyone. But as you said, you can make minor adjustments easily and create the right fit for you!
Can you wash the mask in the washing machine
If you make the mask from 100% cotton fabric as is recommended, absolutely! Just be sure to remove the liner and wash it separately.
Thank you for making this easy to follow tutorial! I appreciate the help regarding elastic 🙂
You are very welcome!
I lile the simplicity of your pleats in your mask. I had a question though. I want to use a separate fabric for the opposite side so people know which side rests against their face. Would doing the same measurements of fabric but doing half in one print and half in another work out the same?
It should, provided you make the intended front the center panel, which does add a couple of extra steps. Do let me know how it turns out if you decide to try it.
Never got it the pattern. I have checked the spam folder.
Hi Peggy, the pattern is not sent to you. You can find it in the FREE Resource Library. If you signed up to receive my emails, you should have received the password. I include the password on the bottom of all my emails. Sorry,I cannot post it here. If you didn’t get the confirmation email with the password, please feel free to email me at [email protected] and we’ll get you squared away.
I have made a few masks and have found an excellent sub for elastic is pantyhose. You can get TONS of masks out of an old pair of pantyhose. It sews easily and is super comfy on your ears.
I got the idea when I saw people using hair bands but heard they didn’t fit well. I remembered using pantyhose as hair bands and it worked.
That is a great idea! It is so difficult to find elastic right now. If you can get it at all, the prices have gone through the roof.
Going to try these. Are the panty liners safe or full of chemicals.
Great question! I would definitely go with the ones made from organic cotton. You can find a link for them in the post.
Do you have a suggestion on measurments for a toddler sized mask? Approx 3 years in age?
Heather, my next post will cover child size masks! Stay tuned.
Do you have a date you will be posting your next one!?!? Haha! I’m being impatient as I have someone waiting on me to make one for their toddler!
Working hard on it!
Thank you for patterns and instructions. I feel it would have been easier to follow with a fabric that had a definite right and wrong side. I had trouble distinguishing which side was which when hemming, just a suggestion.
As I age brain function gets confused and what I used to find easy, isn’t anymore.
Most comments seem to have been able to understand, so it id probably just me !
I understand! Unfortunately, the cotton fabric that I recommend for these masks usually doesn’t have a definite right and wrong side.
I am someone who learns better with visual cues rather than written ones. Do you have a video that explains the process?. I’m having a lot of difficulty understanding how to make the center fold/ pleat.
Thank you
Susan, thank you for your input. I don’t have videos at this time, but I will try to clarify how to create the center pleat. Once the material is cut to the proper size, it is folded in half and pressed so you have a centerline to guide you. Open the fold back up so you have the rectangle in front of you with the center crease horizontal and facing up. Now measure 2″ above and below the center crease. Mark the lines with pins on either side for easy reference. Each of those lines gets folded to meet up with the center and pressed, then pinned in place.
I hope this makes sense. I appreciate your input as it helps me make improvements. I will try to capture additional images to make this step clearer and post them as soon as possible.
So happy to find this pattern. I’ve tried several others, but this is my favorite one by far! It creates a very elegant, “finished” design. I used four 19” ties rather than elastic (because I prefer that method of securing).
Thank you and wishing you and everyone safety and good health!
Thank you Monica! When I created this pattern, I wanted to make sure it was flexible and adaptable, especially since it seems harder and harder to find elastic. The ties are a great latex-free option!
What do you suggest the measurements should be of the elastic and material for kids size.
I have 3yr old and 4 1/2 yr grandkids.
Diane, you can find the complete instructions for children’s masks in this post.
Thank you for a streamlined pattern!! I volunteered to make some masks for a business and have had a very hard time getting pleats to look normal–lopsided pleats do NOT appear very professional! 🙂 I just had a quick question. I did not see a picture of the inside of the mask when it is finished (or I didn’t realize that is what I was looking at!). where does the opening end up? Is it right in the center over the mouth? If so, is that not uncomfortable against your face? I just can’t picture how the opening looks. Thanks!!
Hi Jen, the opening is facing toward the face. When you fold the two sides in to form the center pocket, they overlap. It needs to overlap so the filter will stay in place. You can find more pictures how this looks in my post on children’s masks. I also just posted a video in my Facebook group that shows the entire process from beginning to end.
HOW DO YOU PRINT THIS OUT
Brenda Sue,
You can find the printable on page one of the Resource Library. Just click on “Washable Face Masks”.
I just am so thrilled to have found this pattern. I want to make it for my grandson. He picked out the fabric for his band recitals. That being said, he is large for his teenage years so could you give me a dimension of what size fabric you would encourage me to cut for a larger man’s head. I would appreciate it. Thanks so much and stay safe.
Thank you Barbara! I would try adding an inch to the width but follow the same overall dimensions. In addition, you can also lengthen the elastic a little for proper fit.
If I wanted two different material on each side so I know which side is “clean” and which side is “dirty”
What size should my fabric be cut to.
I would just need to add to take care of seam allowances
on each pieces ?
Hi Rebecca, great question! I have created several masks for which the inside of the pleat in the front was a different material. That makes it easy to differentiate between a clean and dirty side. To do that, you would need to insert a 4 1/2″ piece as the center with a 6″ piece at the top and bottom to create the rectangular piece. If you were to put an 8″ piece in the center with one 4″ piece at each end, you should wind up with a mask with that has one fabric in the front and a different one in the back.
They are Excellent and very cool idea and great content of different kinds of the valuable information’s.
Superb blog post! This blog clearly explains the concept and the information are very useful. Thanks for sharing this information.