“It’s only a mistake if you didn’t learn from it.”
One of my favorite quotes! If you are like me, always busy painting this, redecorating that, you are bound to make a few diy mistakes here and there. Today I am going to share some of them with you along with tips and strategies on how to avoid them.
Doing it yourself is more popular than ever. Not only can it save you a good chunk of change, it comes with a definite level of satisfaction when a project turns out well. I love being frugal! There will be snags, but if you follow a few simple rules, you should emerge from pretty much any DIY project with both your wallet and your sanity in tact. Here are some of the DIY mistakes I have made and the lessons I have learned from them.
1. Painting a room the wrong color
In and of itself, painting a room the wrong color doesn’t seem so bad. But when the room in question is one of the largest most visible and used spaces in your home and the color is poop brown – you get the picture. I can only guess that sleep deprivation and exhaustion related to working and raising kids must have made me crazy enough to just throw a dart at the paint chips in the home improvement store. Or I forgot the floor was brown, and the table… That’s my story and I’m sticking to it. After putting up with it much longer than I should have, it HAD TO GO. I have never been happier to bid a paint color farewell. Here it is as it was. Although I have repainted it a few years ago this room continues to be a work in progress with a few tweaks and refresh projects coming very soon!
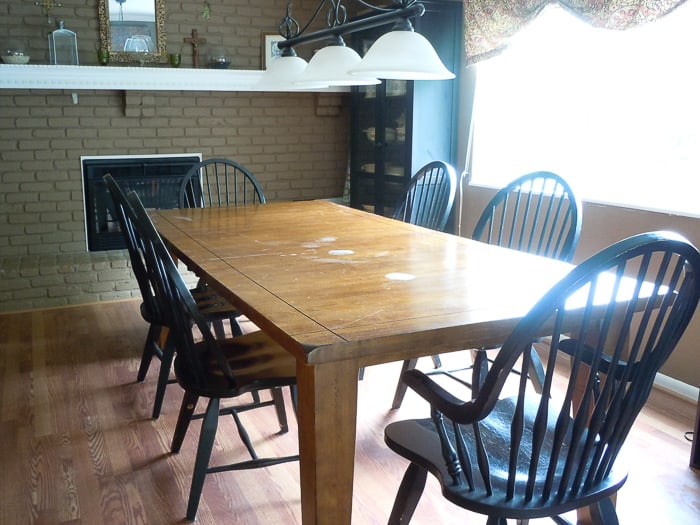
2. Painting my dining room chairs a too bright color
This ties directly into #1 above. It’s easy to get swept up into a makeover, especially if you have endured an eyesore much longer than you should have. It is easy to fall into the trap of the opposite extreme. My efforts to inject color didn’t succeed in everything in the room. This project dragged on much longer than originally anticipated and I simply ran out of creative steam. I can tell you with conviction that I will never paint this type of chair again without a paint sprayer, and neither should you! There is no way to get this right with a brush and rollers! Lesson learned.
To add insult to injury, painting them didn’t solve one pesky problem:
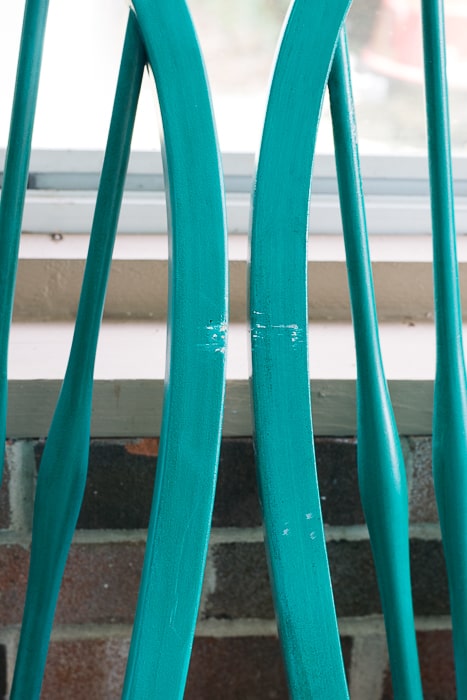
See the marks? Even the new paint job didn’t keep my offspring from slamming the chairs against the table edge. But I should have known this was going to happen.
This project has a happy ending as those of you who follow me on instagram you already know! I’ll be sharing more about that soon!
3. Bringing home recliner chairs to make over

This falls into the “way in over my head” category!
When I saw these beauties being put out by the side of the road, one sunny Sunday afternoon, I had to have them. Sturdy, well made recliners for free, who could resist? My plan to repaint the rattan and recover the cushions with new fabric has remained exactly that – a plan. We moved them inside from our sun room for the Winter just to “test drive” them. I am so glad we did. They are not quite as comfortable as we had thought. And instructions to recover them are complicated and far more time consuming than I had anticipated. Not to mention that I would have to do it twice.
To add to the negatives for this “never really got off the ground” project, I found out that my son loves to pick apart the leather straps that hold them together.

And they are the wrong scale for our living room. Here’s one more look to show you that they are not any prettier from behind!
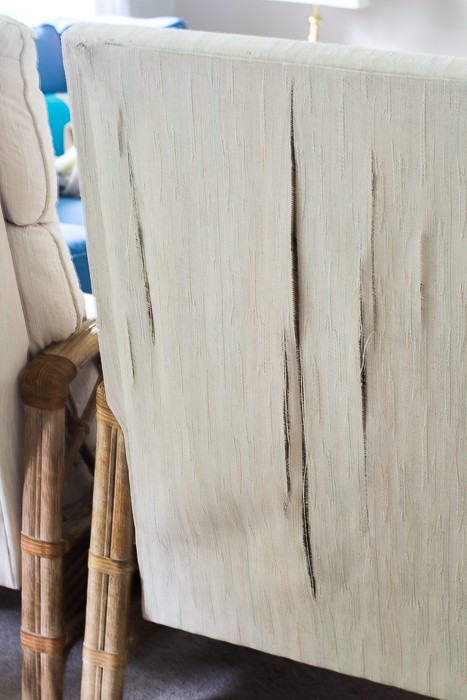
Not digging the shredded look at all. They must go.
4. Wrongly spaced tile and weird colored grout
On to the next contestant for the Hall of Home Improvement Shame!
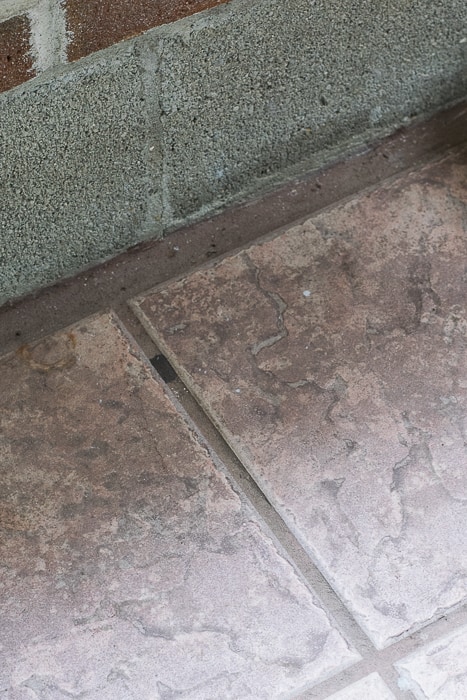
In my defense, this was my very first tile job. I am still not entirely sure what possessed me to space them so far apart. Rookie mistake -more grout, less tile, or something silly like that. This tile was also much darker at one time and has faded considerably due to sun exposure – it is in our sun porch. Since tile is not exactly easy to remove, this has stayed for much longer than it should have, but it is definitely on my radar for replacement. The sooner, the better. I can’t wait to watch someone else do it.
5. Using shower curtains and hooks in place of closet doors

Classy, yes? Dinged up header, tired and worn rods, the complete package, wouldn’t you say?
Even so, I still like the idea of using curtains instead of closet doors. They just need to be much better curtains. And better looking rods. Our closets had louvered sliding doors that made it difficult to access our clothes. The other problem that led me to replace the sliding doors in the first place, was our son’s love for slamming them hard. So hard as a matter of fact, that he put cracks in our ceiling over time.
Shower curtains seemed like a convenient solution at the time, a cheap and easy fix for the door slamming problem. But shower curtain hooks are open and love to get snagged on the rod. They also fall off easily. In short, this is another annoying problem awaiting its solution at our house!
What do you think? Can you relate? I know, I know, everyone in blog land always has perfect homes and beautiful, curated decor. Well, not really. These types of mistakes are much more common than most of us would like to admit.
So what can you do to avoid such missteps?
Don’t jump headlong into a project just because you are tired of the way things look like right now
Tastes change over time and so do the ways we utilize our spaces. Any time you contemplate major changes ask yourself how you want the space to work for you and your family. Is it awkward? Is it working right now? Are there special features that should be accentuated of toned down? Make a plan, create a mood board, gather paint chips, fabrics, decide on textures and finishes. Live with paint samples on the wall for a little bit. In the end the result will be well worth the wait.
Pace yourself
It’s usually best to not try to tackle more than one project at a time. DIY projects almost never go as smoothly as anticipated and giving each one the time and attention it deserves will save you aggravation and very likely money in the long run. Take the extra time, you won’t regret it.
Don’t go above your skill level
Even difficult projects can look deceptively easy on TV. Thanks to lots of editing and having people who do those things for a living! It’s best to leave certain jobs to the professionals. This is one area where you need to take a close look at the job at hand and decide if it is truly worth the effort and stress. I have never reupholstered a recliner and it is too expensive to have it done. I am okay with letting them go. Know your limits.
Even if you put lipstick on a pig, it’s still a pig
My repainted dining room chairs are a perfect example of this. They came with the table, but I was never a big fan. Painting them wasn’t going to change that. Is it something you really love? If you don’t love the style, size, material, let it go and find the kind you truly love and better reflects your style! Save up for it if it’s out of your reach financially, don’t waste time, money and effort on something that may not make you happy in the end.
Research any project thoroughly before you begin
When I made most of my design mistakes listed here, Pinterest really wasn’t a thing, design blogs were not as numerous. Now the opportunities to find answers to any design related question and well written tutorials are endless. Doing your homework will again save you money, time and regrets down the road. Nothing beats knowing how much a project will cost, having the proper tools and plans in hand before beginning.
Will doing it yourself save money?
There are those times when doing it yourself may not make sense. Let’s face it, generally we tackle projects to save cash. Does the project require expensive tools that will be rarely used afterwards? Will you have to take time off from your paying job to accomplish something a pro can do? Then it may not be your best option. To save time and money and to avoid costly fixes down the road sometimes it just makes more sense to leave it to the pros.
Here are a few more useful links that talk about avoiding DIY mistakes for you!
Now go forth and create! Have a good story of a diy project gone wrong? Don’t be shy! Let’s hear about it!
Keep it simple:)

I love your honesty and willingness to admit a mistake. Thanks for sharing
Thanks Marlies! Aren’t mistakes an important part of life? Some of my biggest successes usually came out of a mistake.