If you wondered how difficult it is to apply adhesive wallpaper to stair risers, I have good news for you! It’s a fairly cheap and simple project you can easily accomplish in one afternoon. Besides hiding unsightly scuffs and adding a pop of color or texture it is also very renter and budget-friendly. It’s fast and perfect for beginners that is, unless you try to do it at our house.
This is not the same old boring “perfect blogger creates amazing project while sipping a latte” story. You see, at our house, we somehow find a way to turn even the simplest, straightforward project into an ordeal that can stretch on for weeks.
My blog isn’t called “The Witty Gritty Life” for nothing. I like to believe there is wit. This time there will be lots of grit, you’ll see! There may have been fist-shaking and ugly crying and the ever so fleeting consideration of calling a divorce lawyer. Over stairs? Really? Yes, really. Read on.
Don’t worry, you won’t have to go through the same ordeal. It really is a very simple project. You will definitely succeed because I can share all the things you shouldn’t do!
Here is the sad before image of the stairs:

Pretty grody, right? And that is after they got a serious scrubbing. The bright orange treads are not exactly my favorite thing, either, but since they were waxed by the previous owners it’s more difficult to stain them a different color. Now, before I go on, I have to tell you that this will not be the only “before” picture of this same exact project. It’s just the first one.
Well, as I mentioned above, things didn’t go as planned. But because something went wrong, I can actually present this entire project in a way that others might not be able to. I can answer some questions for you from personal experience, rather than having to guess. I suppose that was worth at least some of the aggravation and agony.
GIVING YOUR STAIRS AN UPGRADE WITH SELF-STICK WALLPAPER
The internet is full of fun inspiration pictures like these Marimekko wallpapered stairs. I love the idea and couldn’t wait to try it.
The stairs I planned to makeover get a lot of abuse. We live in a split-level home and have a short flight of stairs going up to our bedrooms. They are right off the foyer and quite visible from our living room.
Tired of looking at the beat-up, scuffed up mess, and not at all motivated to paint them again, I decided to spruce them up with temporary wallpaper. It’s durable, washable and hides a multitude of sins.
After admiring wallpapered stair risers on Pinterest forever, I knew this would be the right solution for this trouble spot. It just took a while to find the right pattern at a price I was comfortable with.
As decorating projects go, this one is quick and easy and doesn’t require any fancy tools. The most important part is that the stair risers are clean, smooth, and painted to allow the adhesive on the wallpaper to stick properly.
Our stairs were in pretty good shape overall and just needed a good once over to get stray scuff marks off.
For other ideas, tutorials and lots of useful printables check out the FREE Resource Library. Just sign up here and the password is on its way to your inbox.
* This post contains affiliate links. If you make a purchase by clicking on an affiliate link, I may earn a small commission at absolutely no additional cost to you. You can view my complete affiliate link policy HERE.
HERE IS WHAT YOU NEED TO APPLY ADHESIVE WALLPAPER TO STAIR RISERS
- self-adhesive wallpaper of your choice – this is the one I used
- measuring tape – use a flexible one, like the kind used for sewing
- scissors
- long ruler or quilting ruler
- dough scraper or old credit card
- utility knife or craft knife
Add a pop of color, go neutral or add some texture. There are lots of different options to choose from.
STEPS TO APPLY THE ADHESIVE WALLPAPER
PREPARE THE STAIR RISERS AND WALLPAPER
To make the end result more durable, remove the trim piece at the bottom of each step and re-attach it after the wallpaper is applied. This will keep the paper from peeling off easily.
Get the measurements for each riser. Stair risers will usually measure the same in a straight run of stairs, except for maybe the bottom step. For me, this meant that I could fit three steps’ worth of wallpaper into one width of wallpaper as each riser was 6″ tall and approximately 36″ wide. The wallpaper is 21″ wide. Measure and cut each piece to the desired size.
Cut each piece just a little wider than the stair riser.


One important note on the wallpaper. Subtle patterns like the one I chose, are a snap to apply because they will work in any direction. If you do choose to use a bolder pattern, you need to take care to match it well, to keep it from looking chaotic.
Once all the pieces are cut, carefully peel off the backing, making sure the paper doesn’t stick to itself. Line up the top edge of the paper with the top of the stair riser and smooth out the paper gently as you go. A plastic dough scraper or old credit card will help with the bubbles.
Applying each piece of wallpaper is not a difficult job. I may have had a minor mishap here when a current Costco card was lost, but I digress.
Here I am in action:

Trim any overhanging wallpaper with a utility or craft knife.
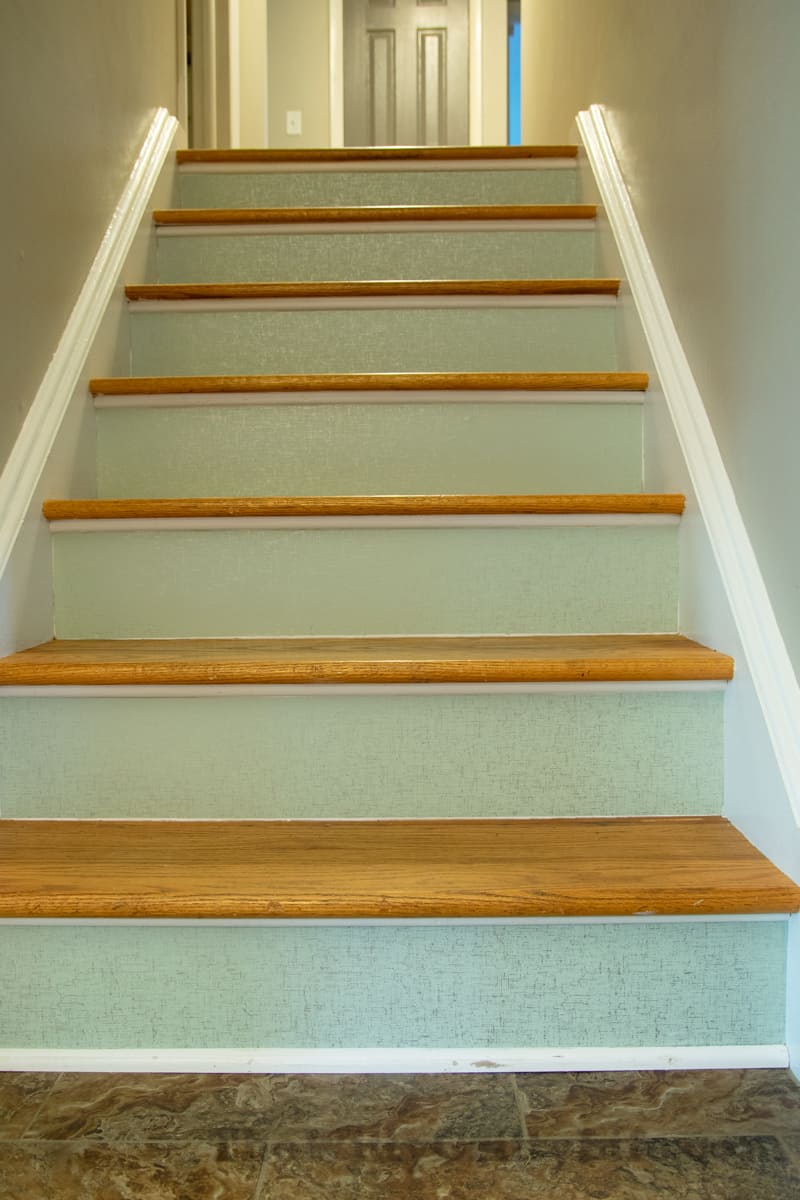
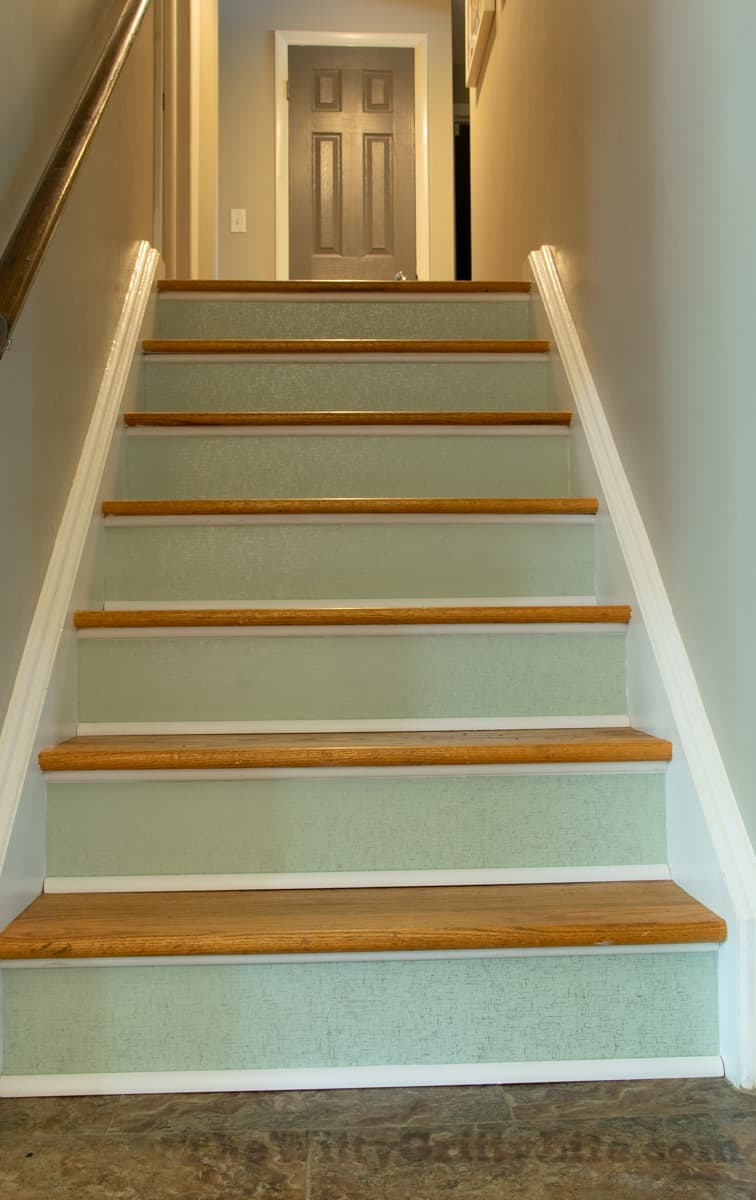
After repeating the process for all seven risers, it was time for me to step back and admire my handy work.

Doesn’t it look so much cleaner? At this point, I was pretty happy, except for the scuffed bottom trim piece, which clearly needed touching up. Once the wallpaper is in place the trim can be reinstalled. Done. At least that’s how it should be and I promise it will be for you. Now read on for what you shouldn’t do!
WHERE THINGS WENT HORRIBLY WRONG FOR ME
Little did I know that this bottom trim piece would be the beginning of all the terrible that happened with this project. My woes began when I tried to reattach the other bottom trim pieces. It was much easier said than done. The trim was made from apparently bulletproof red oak, spray painted white, and it didn’t want to be nailed back on.
Or maybe it didn’t like the nails I was using. In any case, it turned out to be so much harder than I thought. After a few tries, during which the nails went in part way and not any farther, I decided it was definitely better to drill pilot holes. But now the nails that were hammered in partway wouldn’t budge, not one bit.
I even went so far as to cut some of them off with my jeweler’s hack saw because I figured I could easily patch everything once the trim was installed.
AND THEN IT GOT MUCH WORSE…
This is where I handed the hammer to my spouse. He diligently nailed all of the trim pieces on and put a few more holes and gouges in the trim in the process. My efforts to paint the trim ahead of time so I wouldn’t have to do it in place were down the drain. Completely. That still was not the bad part.
When I inspected the trim, I noticed that the very bottom piece, the one in the picture above, was not the same size. So I asked hubby to remove it, which he gladly did. I left him to work in peace and decided to get a shower.
AND WORSE…
He took the initiative to do something he hadn’t been asked to do and ruined the entire project. You see, in the short time it took for me to shower, he figured he would help me out by sanding the patched trim. Now, normally that shouldn’t lead to the demise of the wallpaper on the stairs.
But when my honey does something, it’s “go all the way or go home”. He grabbed the closest available sanding contraption – a large drywall sanding sponge – and sanded like the devil was after him.
Stair riser after stair riser, parts of my newly and proudly applied wallpaper had a good chunk of its finish sanded off, revealing nothing but white vinyl underneath. It was glaringly obvious right away. How he could not have realized what he was doing and proceeding on, well, that eludes me to this day. Must be a guy thing…
This is were the lamenting, fist shaking, ugly crying and ever so brief divorce lawyer thought came in. There was no way of salvaging any of it. And living with it the way it was was clearly out of the question.

It took me a few days until I was ready to get back in the saddle. But I had to undo the hurt and pain of having to look at this mess every time I walked up the stairs.
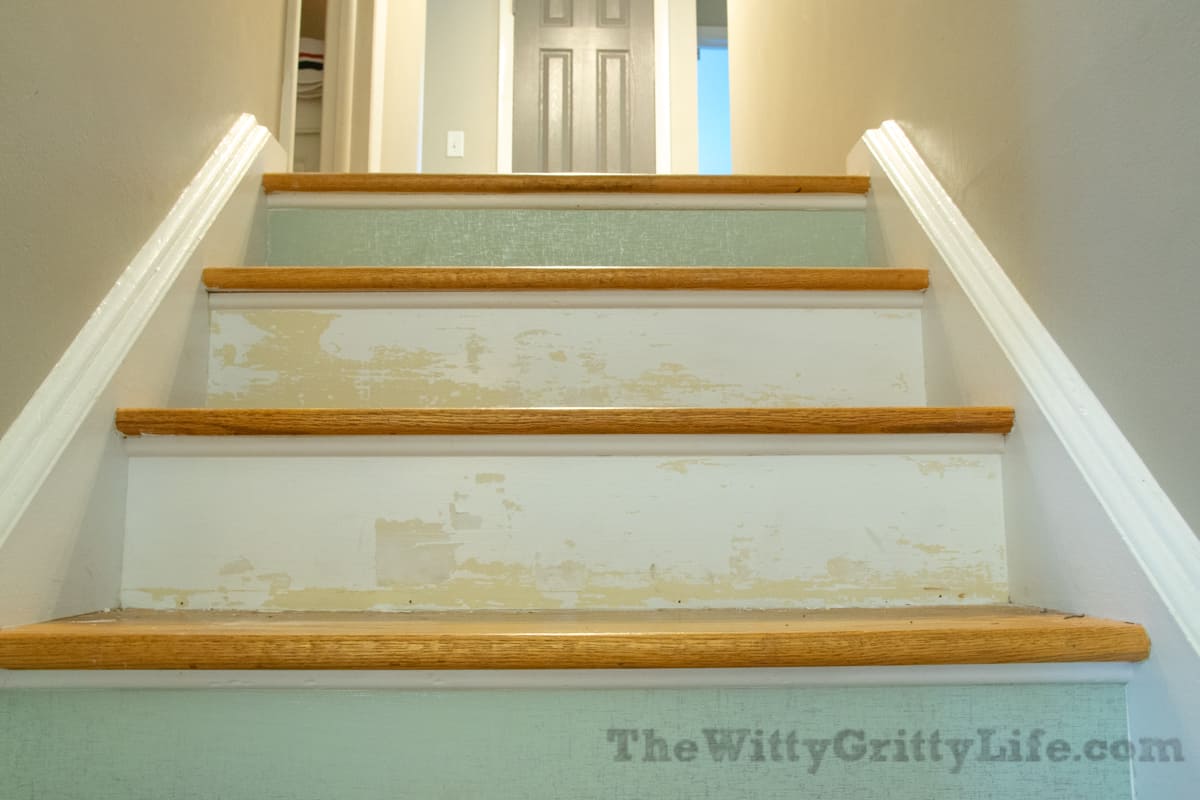
Removing the damaged wallpaper was easy. It pulled back off each step in one piece. But as you can see, it also took quite a bit of the underlying paint with it. I have a hunch that the yellowish layer of paint on our risers was oil-based paint that was painted over with latex.
I have since used removable wallpaper on a wall painted with latex only. While re-positioning the paper and peeling it off a couple of times, the paint stayed completely intact.

After it was all said and done, I scraped off any loose paint and sanded everything smooth before applying the temporary wallpaper for the second time.
Thankfully there was just enough of it to do all of the stairs once again. So, in the end, it didn’t wind up costing extra. It made more sense to buy new trim for the stairs because the old oak trim is too beat up for me to even want to mess with it. I may be frugal, but I am not that much of a glutton for punishment.
And here it is nearly finished for the second time. The trim is not yet attached in this picture. It needs another coat of paint and I ran out in the middle of the project, but you get the idea.

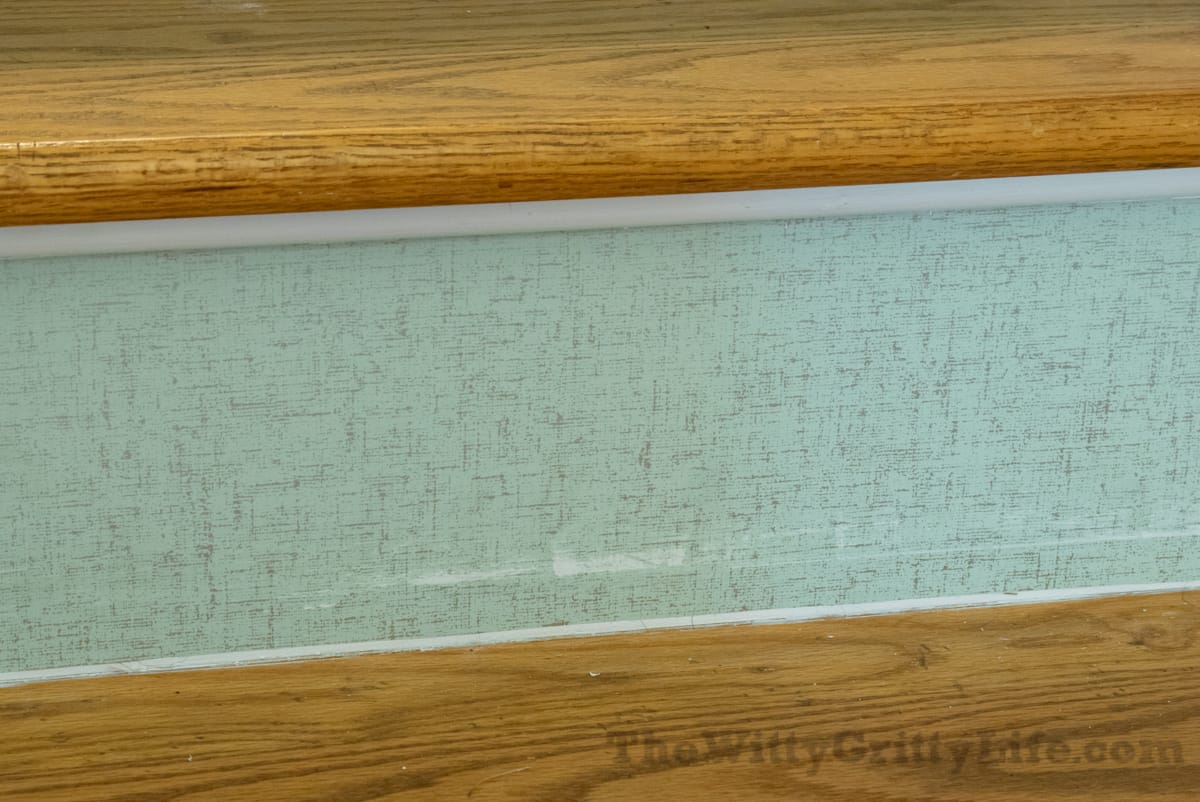
The pattern is a lovely light minty-green with a hint of silver shimmer. I chose it because it has a little mid-century modern vibe to it while remaining fairly neutral.
I just didn’t think I could look at a bolder pattern for very long. And after what this project put me through mentally, I am pretty sure I don’t want to be changing it out anytime soon. Not that it wouldn’t be fairly easy.
Here I created a little mockup to show you how much you can change the look of your stairs depending on the wallpaper you use.

While it turned out to be a comedy of errors but I can only recommend this project! Just make sure your helpers are closely supervised at all times. Thankfully, our marriage survived and I hope it was worth making some mistakes so I can pass what I learned on to you.
Have you ever considered applying temporary wallpaper to stairs? Do you have any DIY mishaps to share? Judging by some of the responses I received on Facebook after I initially posted about this fiasco, I am definitely not alone in having a project ruined! Don’t be shy!
UPDATE: It’s been nearly three years since I installed the adhesive wallpaper to our stair risers and it is holding up excceptionally well to the daily wear and tear.
Be sure to “Like” The Witty Gritty Life Facebook page and join our group of fabulous followers in The Witty Gritty Life group.
Follow my shenanigans on Instagram here.


You make me laugh. And I’m glad I do t have stairs. Lol
Thank you Marlies! I am glad you enjoyed reading it. Things often don’t quite work out as planned and it certainly helps to see the humor and the lessons in it.